1966 Alfa Romeo Giulia – America (Part 9)
First, let me apologise for the long delay in giving you an update!
Good news, if you are an American and want to buy a European car (especially on www.bringatrailer.com BAT!), have no fear of importing a 25-year-old car to America. Read on!
Before we get too far, maybe some of you missed the previous segments of our trip, so here they are:
1966 Alfa Romeo – Road Trip
1966 Alfa Romeo – Vesuvius and Pomepii
1966 Alfa Romeo – Perugia
1966 Alfa Romeo – Pisa & Manarola
1966 Alfa Romeo – Varese, Italy
1966 Alfa Romeo – Lausanne, Switzerland
1966 Alfa Romeo – Darmstdat, Germany
1966 Alfa Romeo – Amsterdam
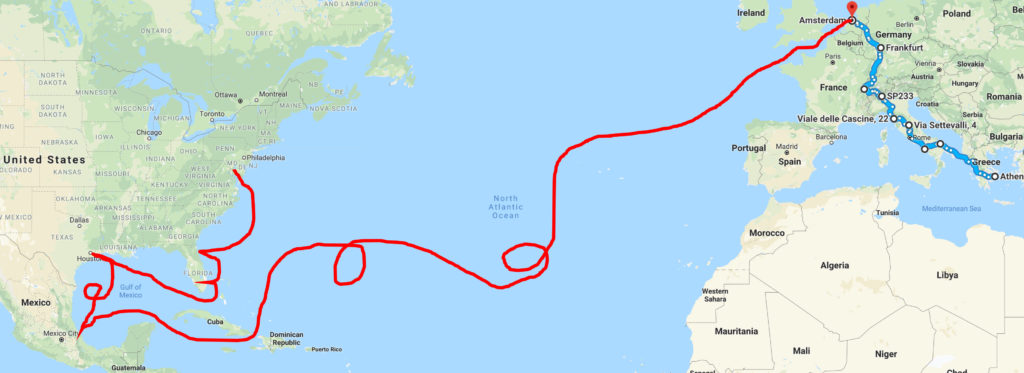
The 1966 Alfa Romeo Giulia left Amsterdam on 22-July-2017 and arrived in Baltimore on 12-September-2017. Yes, that is 1.5 months! Where did it go in all that time?
It sailed on the “Hoegh Beijing 66” to Mexico, then to Houston, then to Florida, and possibly other locations, all during hurricane season. I was white knuckling it for weeks. The primary reason for the incredibly long journey was due to Hurricane Harvey (Aug 17, 2017 – Sep 3, 2017) and Hurricane Irene (August 21, 2011 – August 28, 2011). The Alfa hit both hurricanes and had to ride out the storms outside of these ports, waiting for them to re-open. It finally got to Baltimore on Tuesday (12-September-2017) and I drove it away on Friday.

Deep in the bowels of this ship is a 1966 Alfa Romeo.
For the real ‘boat spotter’ in you, there is a website dedicated to boat spotting. The Hoegh Beijing has a few photo entries so click here to see where this boat has been spotted.
I wonder who she met on her adventure?
Was it hard to import this car? No. No. No. In fact, it was incredibly easy. I worried and sweated bullets, wondering what is going to hang this car up in customs forever or be rejected completely. Am I going to just need to push the car in the Chesapeake Bay due to paperwork hassles? I spent hours googling and researching, finding all the various forms and regulations, and I even contacted the EPA and DOT for questions. All that worry was wasted. Why? The matter of filling in the papers is all done by your import agent! I used Dan from AllWays International Shipping (Baltimore). After spending hours with my PDF editor filling in the forms, I sent them to my import agent, and he said I wasted my time as it is his job to do it, as he needs to put his company name and stamp on these forms. I was relieved, even though I felt a bit foolish filling in these forms. The forms are: EPA 3520, DOT HS7, CBP 7501, CBP 3461.
The car hit the port of Baltimore on 12-September-2017, and Dan emailed me this update. I called Dan on Thursday (14-September) to see how it was going, as I had hoped the Giulia would get cleared before the weekend. Still had not cleared on Thursday, so my hopes were diminishing. On Friday, I resigned myself to pursuing the paperwork for the following week. But for some reasons, I called Dan on Friday at 10 am just to see how it was going. He said I needed to pay some small fee to the shipper (like $30) for something and then, the car would be released. Released! My heart was racing now. I immediately called Florida (base of the shipper) to see how I could pay this last fee and get the car. I ran over to Bank of America and did the transfer, and got a nice official print out from the bank, I then took a picture of it, sent it to Florida (the shipper would not take proof of payment if I did the payment from my phone). I called Dan at 11:30 AM and he said the car is released for pickup. 30 minutes later, I was deep in the docks of Baltimore, at his office, and he handed me the paperwork in hand (EPA 3520, DOT HS7, CBP 7501, CBP 3461).
Next stop, Maryland Department of Motor Vehicles – this was not going to be fun. I got to the DMV at 12:45, took a number and got in line. I showed the information desk my papers, and questions like “Where is Greece?” and “What are those funny characters?” (as the title was in Greek). I got handed to the only employee who had done this before, and she was great. Looked at each form, she went down her checklist, and it was all approved. In Maryland, there is a new historic plate for cars over 50 years old, the fee is lower, and is less hassle when it comes to the renewal process. I already called my insurance company, and they said just quote the policy number on my other vehicles, and that was it. Finished at 1:45 pm.
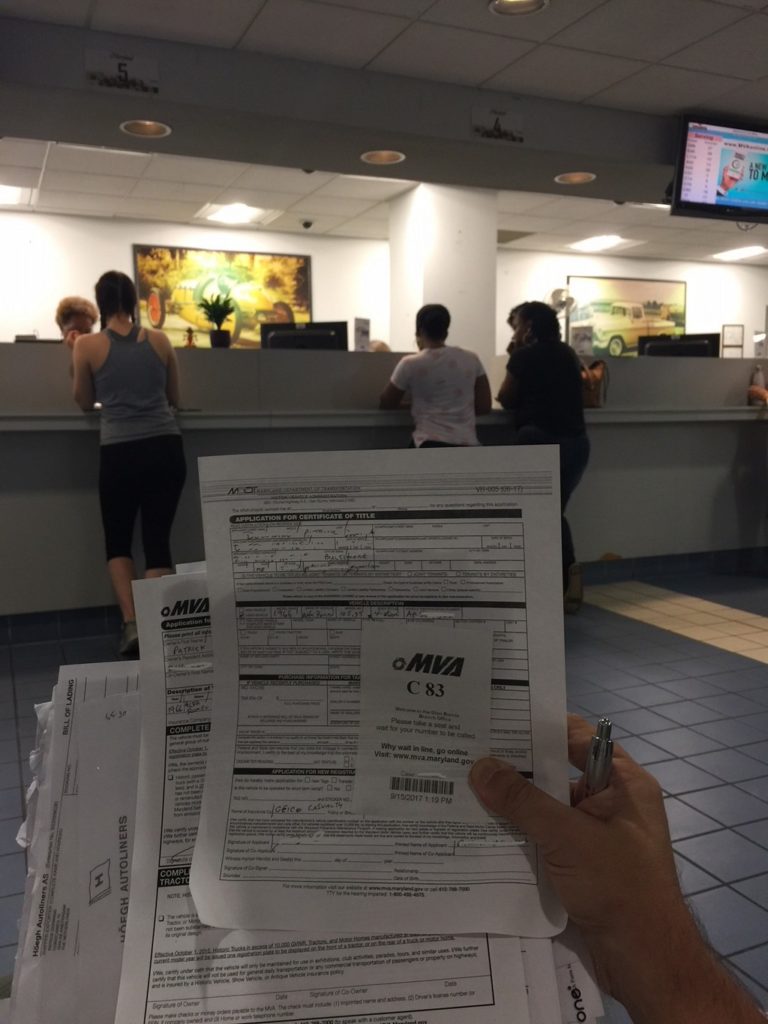
Maryland Department of Motor Vehicles queue.

Titled, insured and with tag in hand, we rush to the port.
Back to the docks of Baltimore, and I needed to move fast as the closing hour for picking up cars is 3 PM. I sped a little and got there at 2:15 PM. Again, I was confronted with an easy process handled by a classic old-school Baltimorean lady. I would have taken a picture of her, but it said “absolutely no pictures”, so I guess she gets asked for pictures quite often. She checked my papers, and less than a minute later, I was walking to the booth in the middle of a vast parking lot. There was an endless sea of new Mercedes, Toyotas, and other new cars. But there was a cool area full of classic cars, such as Porches, Jags, Land Rovers, and many more. This area for the self-imported cars was so big, I could not see my Alfa, even when I stood on the elevated platform attached to the booth in charge of fetching the cars. I handed to the guys in the booth my papers, they grabbed a portable jump start battery and drove far away to get my car. Would it be storm damaged? How screwed up was it going to be? For weeks this car was bouncing around on the high seas, during hurricane season. I expected the worst.
The boys drove up right in front of the booth, and the car looks great! I paced around it 2 times looking for problems, and I found none. Still, my heart was pounding. Why? Not sure, but it just felt funny to drive this exotic European car in plain old America. I zip tied the license plate to the license plate frame, right over top of the Greek plate. I started it up; she ran just as good as when I left her in Amsterdam. I drove out of the lot, smiling ear to ear.
It was like a first date. I had new experiences with her, like using my electronic toll pass with her, driving her under familiar signs on the highways around Baltimore. She ran really well.
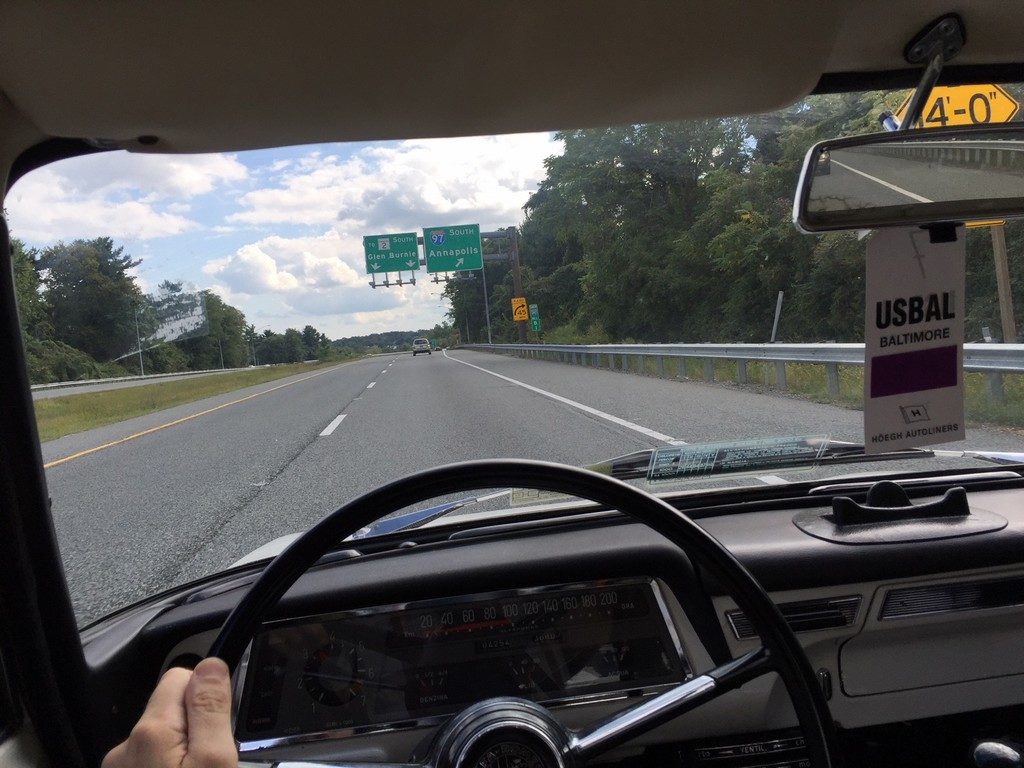
First drive in the USA. Feeling giddy, like a first date.
Summary: Things you need to know about shipping:
Importing a 25-year-old car is easy. Find a European shipper, the cheapest port is typically Rotterdam/Amsterdam. I used Hischam and he was in our Amsterdam story. The shipper can help find you an import agent, and I used Dan from AllWays in Baltimore.
Costs:
- Hischam for shipping was 690 Euro.
- Dan for importing was 527 USD, and most of this was a Federal import duty.
- The shipping company was 97.65 USD for “wharfage/handling”.
- Titles/Tags/local state tax – varies widely.
The shipping and importing was so easy – there is really nothing to get stressed about (perhaps that is because I used Hischam/Dan).
To drive around Europe, you need title/tags/insurance. Each country will have a different set of rules. Rules change all the time.
- Greece: there is a 30-day export title/tags/insurance.
- Spain: I contacted another BAT seller from Spain, and he said Spain had something similar to Greece.
- Germany (and possibly surrounding countries) have http://www.export-plate.com/ and you need to check with them before you buy your car. Do not rely on their wizard on their website, you could be very sorry.
- Hischam, our man in Amsterdam!! He says he can help and get 30-day tags for the Benelux countries, and possibly other places. He is super cool and resourceful. Just contact him and ask away.
I am surprised there is not a club or a Wikipedia entry that has all the information you need to register/insure a classic car in Europe. Perhaps BAT or someone needs to make it, as it would certainly spur on a lot more adventures like ours. Perhaps I have a new project!
+++++++++++++++++++++
America! Big roads, small car.
+++++++++++++++++++++
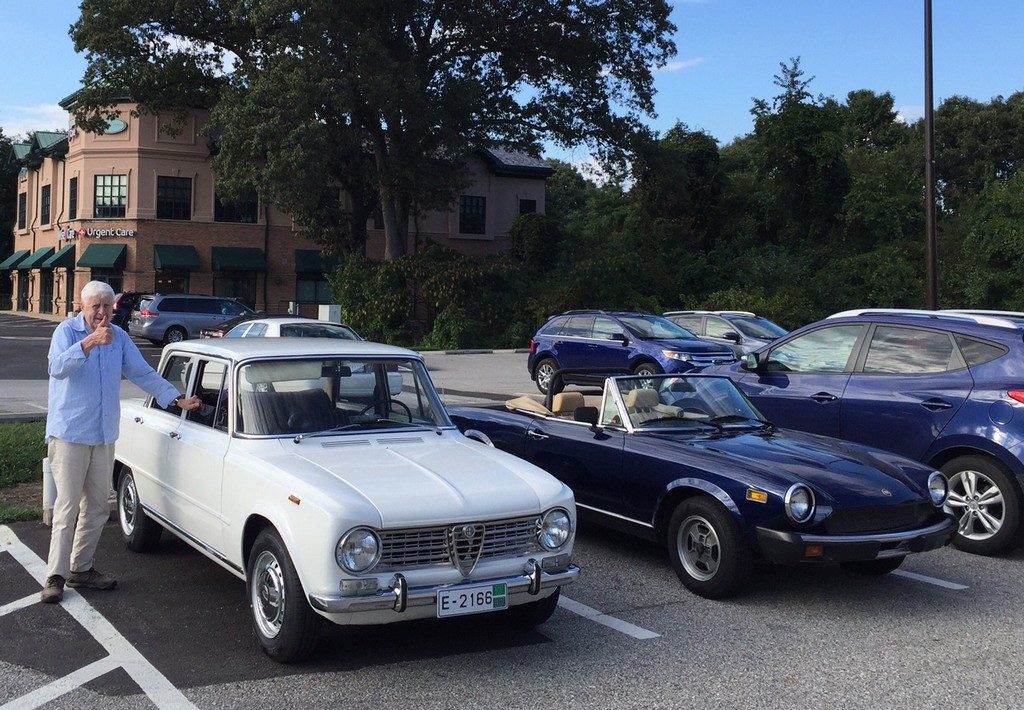
My father is 93. World War II vet, flew 50 missions as a gunner in B24 bombers at the tender age of 19. Dad gets around fine, drives, and goes to the same restaurant/bar every day, and does it at the same time every day (+/- 5 minutes). I wanted to get back in time, so we could take the Alfa on its maiden voyage to Adam’s Ribs, Severna Park, MD. I arrived at my father’s house at 4:30 pm, just in time. We headed over to “The Rib” as the locals call it. I got lucky and a spot close to the front was available.
While I was parking, there was some commotion; a lady ran up to the car, and her husband sat in their car blocking me in. Had I hit something? Did I run a light? Nope, she and her husband were Alfa Romeo fanatics and celebrated the addition of another Alfa to the local scene. They said I was in luck, as the Alfa Romeo local Washington DC chapter was meeting the next day (Saturday), and if I could come, it would be a great honour to have a rather rare Alfa (for America) show up. My brain fixated on how I could squeeze this event in (1.5 hours each way) and do all the family stuff I needed to do. My family knows very well my obsessive nature for all things mechanical, so they cut me some slack and I was a free man!
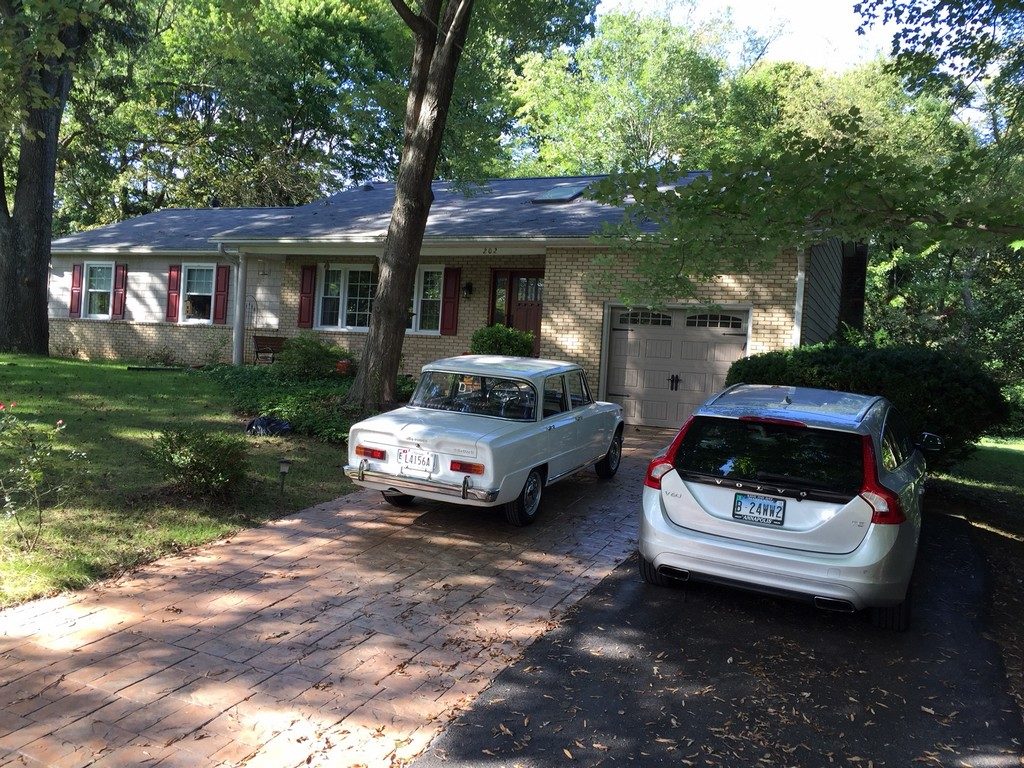
Dad’s house in Severna Park. Notice his license plate?
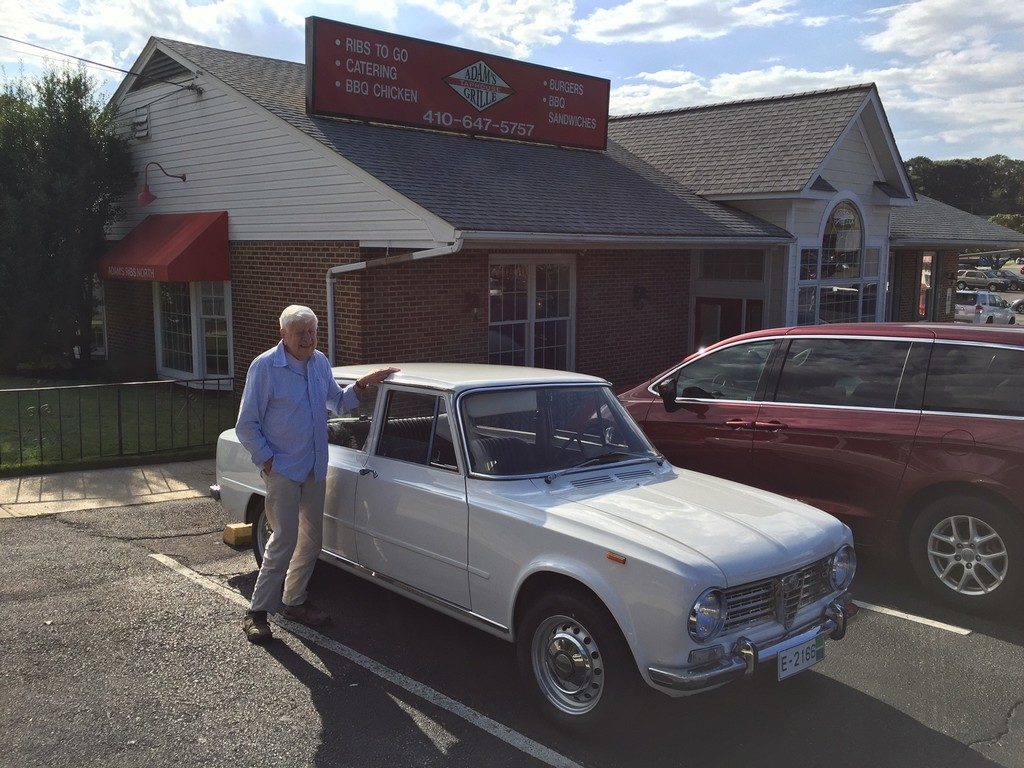
Same place every night for dinner and drinks with friends.
Looking good at 93! Thanks Dad for being so adventurous.
On Saturday morning, I went for breakfast with my friend Trish at a classic eatery/dive in Annapolis. We ventured to the world famous “Chick & Ruth’s Delly”, the name derived from the names of the owners. The place has been there forever; walls are covered with pictures of famous people who have eaten at this very cramped diner. It is a very popular eatery for the Midshipmen of the Naval Academy and the lawmakers at the Maryland State House (head of Maryland government), as they are both less than 300 metres away. Amazingly, I got a parking spot right in front! Perfect photo opportunity. Check out the line of people. Ughhhh.
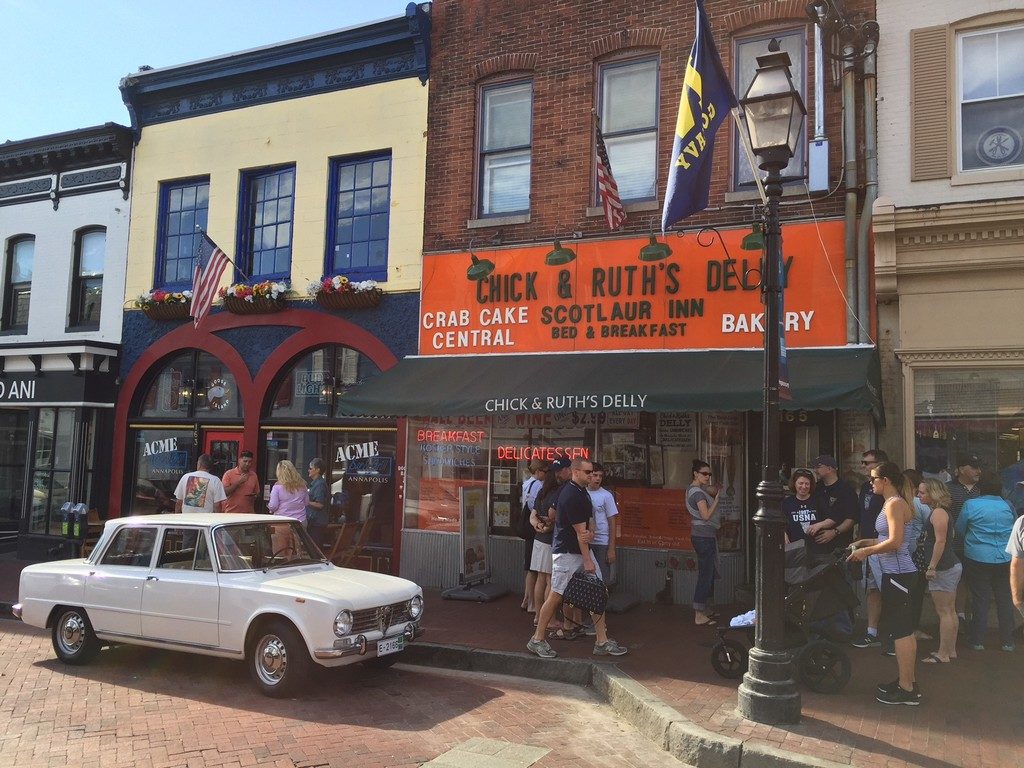
World famous ‘Chick & Ruth’s Delly’, Annapolis.
The Alfa Romeo meeting started at an Alfa Romeo dealer in Northern Virginia, around Tyson’s Corner. The dealership owner was great and extremely inviting. After the meeting at the dealer, we did a 50-minute drive through some gorgeous countryside, and off to a club member’s home, where plenty of food and drink was on hand.
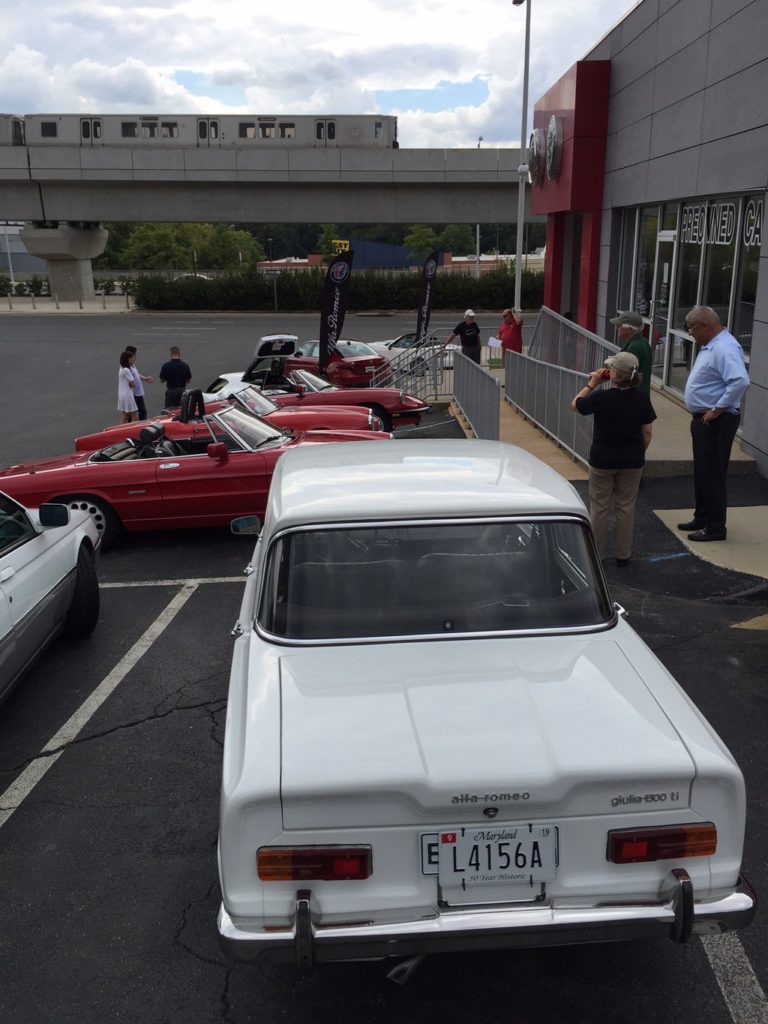
Alfa Romeo club meeting at Alfa dealer in Tyson’s Corner.
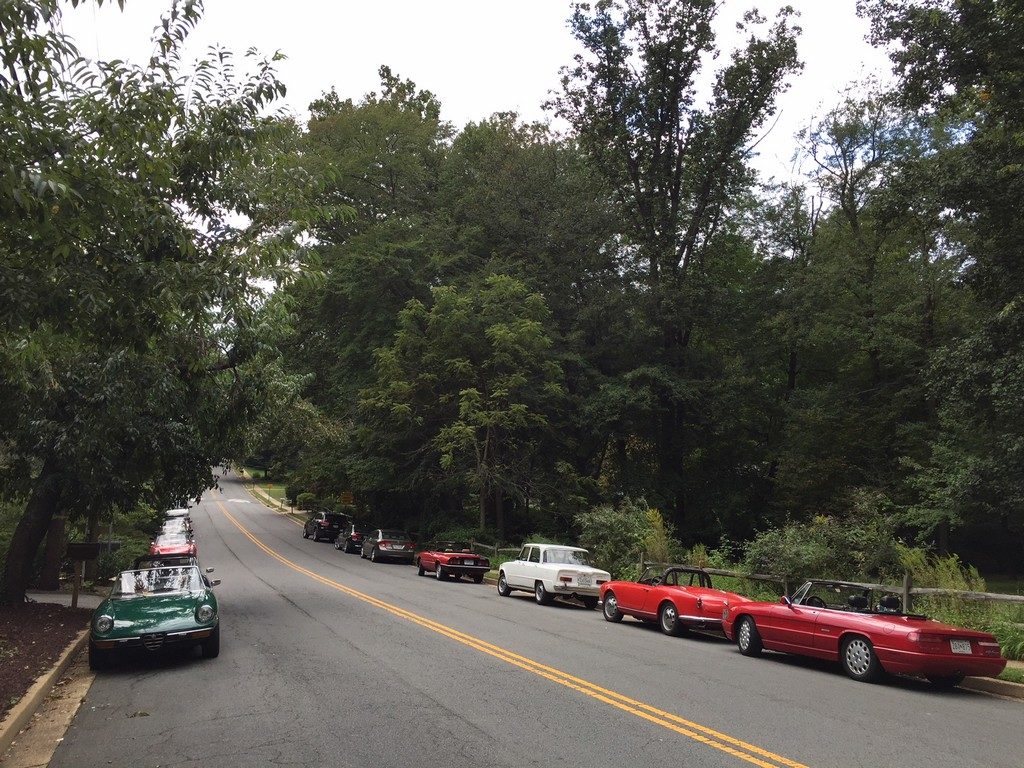
Alfa Romeo club meeting in Vienna Virginia.
+++++++++++++++++++++
Modifications for the trip
+++++++++++++++++++++
In order to make the car roadworthy, safe, comfortable, easier to use, and to be able to use modern electronics, we embarked on a few modifications to the car while it was in Greece. I will provide links to all the items I bought, so you don’t have to do as much research. I get nothing from Amazon or these other vendors.
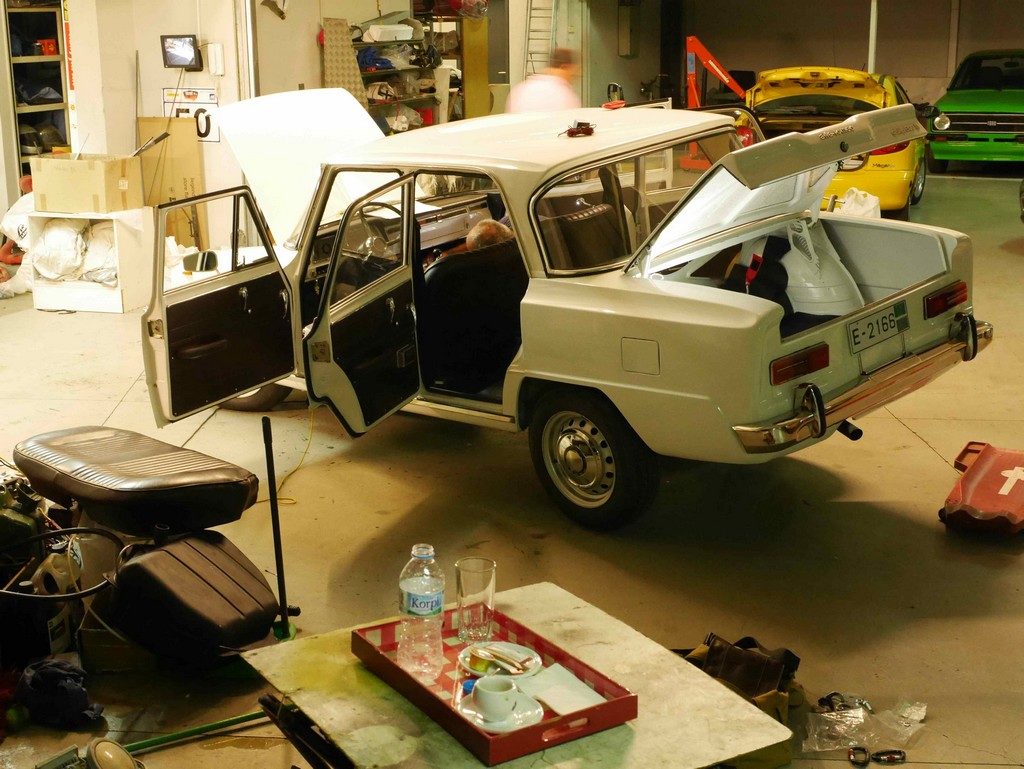
We prepped the car for a day in Greece.
Here is a list of modifications we undertook before we left Greece:
- 5-point harness to keep a kid safe in the back seat.
- Third brake light, as most classic cars have very dim tail lights.
- “123 Ignition” electronic distributor. What a great device!
- Wide angle rear view mirror. The Alfa rear view mirror is tiny. There is no passenger side door mirror. This large wide-angle mirror is a must.
- Cigarette lighter charger. There is no cigarette lighter in the car, so we hard wired it to a 12v switched source.
- Bluetooth speaker. Incredible device, and filled the car with an amazing amount of music. Plug it into the USB cigarette lighter, or let it run off of its internal battery.
- 20,000ma USB battery for charging accessories.
After we got to America, we did some other small updates, as we learnt a lot after the big European adventure.
- Sheepskin covers. Wish I had these on the trip. The vinyl seats were a little sweaty in the summer heat of southern Europe.
- Front retractable seat belts. The Giulia had the original Klippan retractable seat belt, but they had seen better days. New set makes it much easier to get in and out. Wife and father are much happier.
- Little pouch between seats. Old cars don’t have all the places to put things like modern cars do. This little pouch was really handy.
- Oil in steering box? When we serviced the car in Italy, we noticed the steering box needed oil. But the oil would drip out over 5-7 days. This new 1200w lube fixed that problem.
I ordered all these various parts from Amazon before I got on the plane to Greece. Once you hit Greece, you cannot rely on Amazon Prime delivery or easy access to a Home Depot. You need to have all parts, tools, extra wires, cutters, wrenches, crimpers, light bulbs, heat shrink tubing with you before you get on the plane to pick up your car.
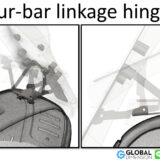
Modification 1: 5-point harness to keep a kid safe in the back seat.
As many of you noticed, we had our 7-year-old kid with us on the trip. Old cars are inherently unsafe, compared to today’s cars. The 1966 Alfa Romeo Giulia had no rear seat belts, so how do we make the car safe for him and also compliant with the law? The EU says any kid over 135cm does not need a kid’s seat but certainly needs proper seat belts.
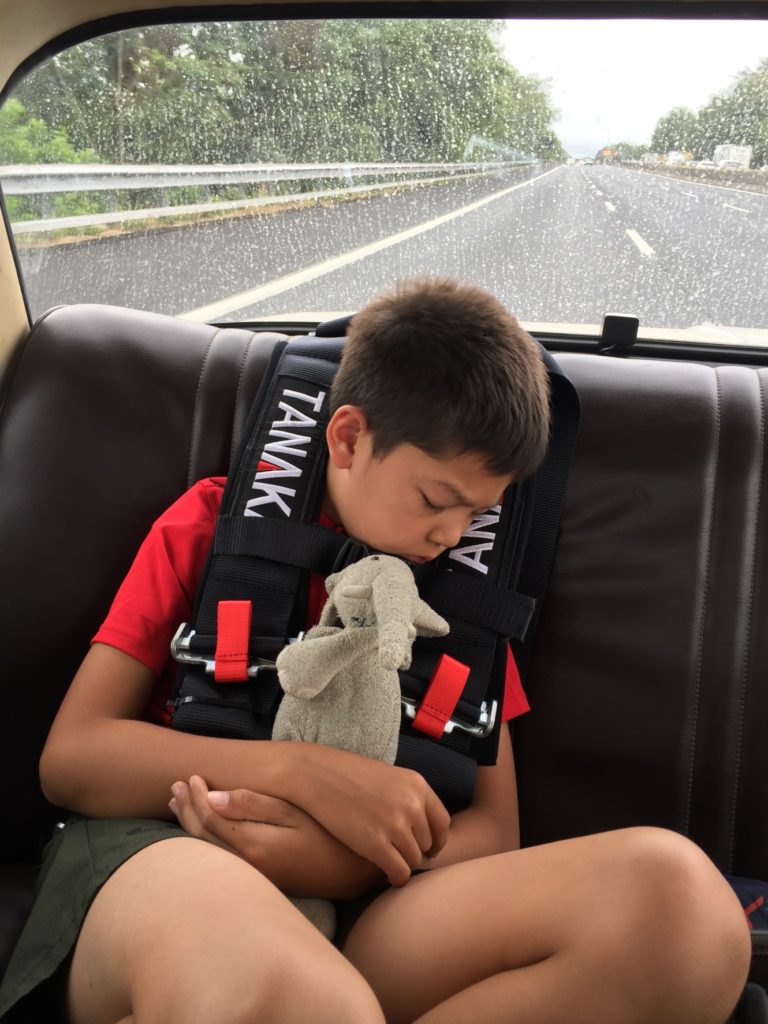
Raining from Sorrento to Perugia. Jake takes a nap.
I looked at many different options and settled on a 5-point racing harness. What? Yep, a 5-point harness would certainly keep him firmly in the back seat. Would it be too big and he would slip through? After doing a lot of research, I found that the Tanaka brand had a very strong clip that holds the 2 shoulder straps together. So, with this in place, he would not slip through. Tanaka makes several models, so we used the product on Amazon called ‘Tanaka SFI 16.1 Latch and Link 5-Point Safety Harness Set with Ultra Comfort Heavy Duty Shoulder Pads‘ and is located here https://www.amazon.com/gp/product/B01MG0D0SG/
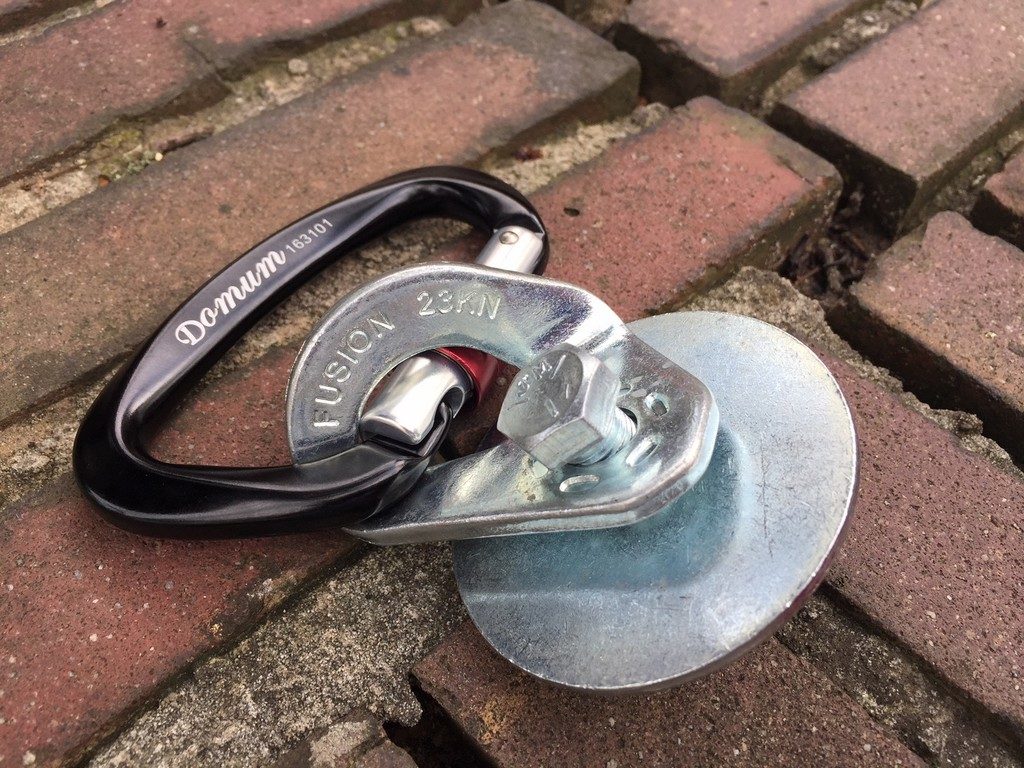
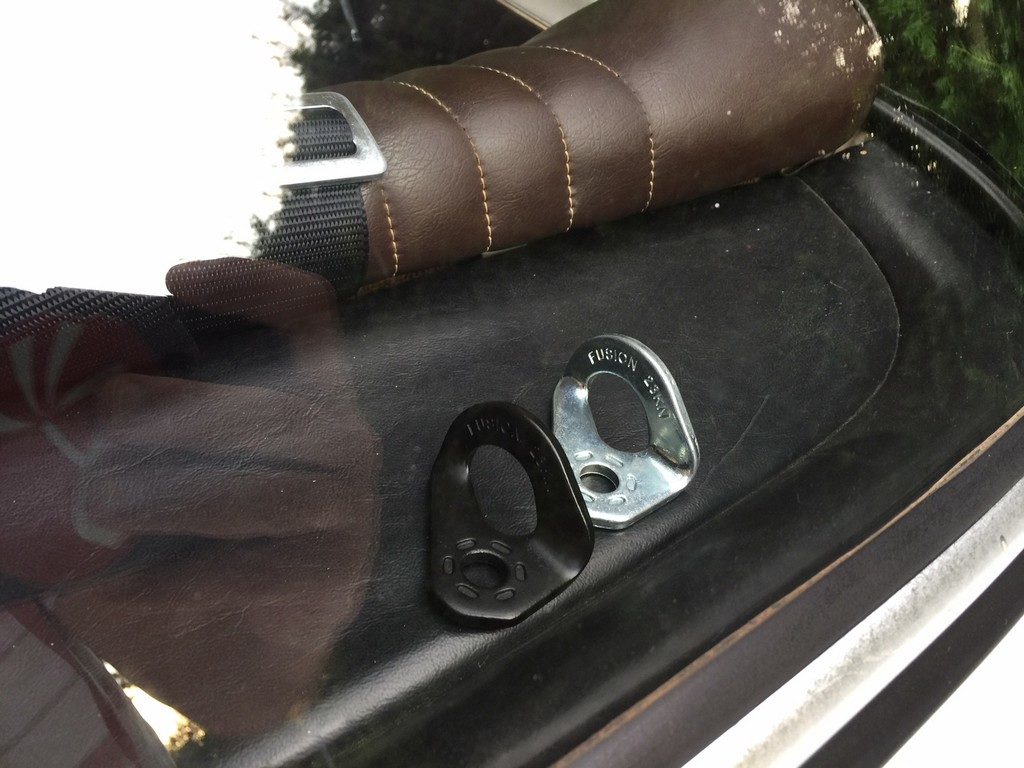
How do I get it installed in a car that never had rear seat belts, not even simple lap belts? We did have to drill 4 holes in the floor and we installed standard lap belts. On 2 of these floor mounted bolts, I put a rock climbing device on the bolt that would allow me to easily remove the 5-point harness in the future, without removal of any bolts (or need any tools). The rock climbing device is called a “bolt hanger” and some rock climbers will actually put expanding bolts in the rock face, and put the “bolt hanger” on the bolt so that they can clip carabiners and ropes to these hangers. As they are rated for 25,000NM (4500lbs), they are pretty strong for seat belt mounts. The 5-point harness has a metal bracket at the end of each strap that would accept the standard 12 mm seat belt bolt. To connect the 5-point harness metal brackets to the “bolt hangers,” we used a standard rock climbers carbineer.
The “bolt hangers” we used are called Fusion Climb Cabal 12 mm and are 23KN rated, and on Amazon are here: https://www.amazon.com/gp/product/B01KVUJSMY/ . We used the Domum carabiners with a 25kN rating. Again, on Amazon, they are here: https://www.amazon.com/gp/product/B01M59LLZN/
The assembly that is bolted to the floor. Standard lap belt also shares the same bolt.
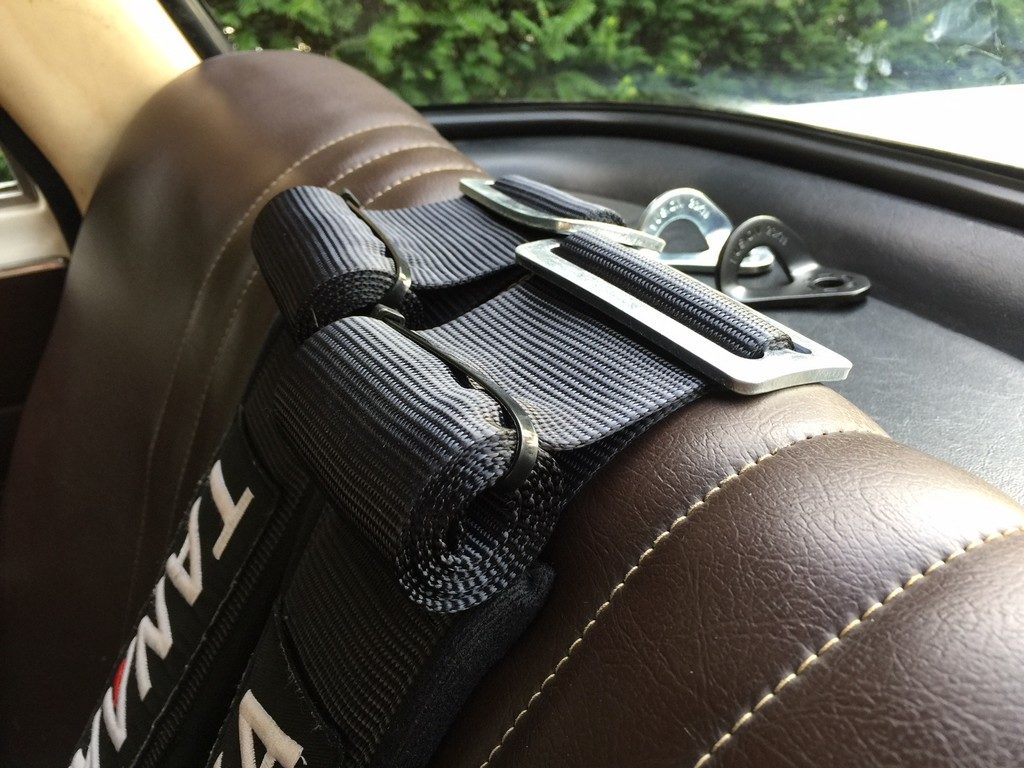
So, that worked great for the lap belt/crotch strap portion of the 5-point harness, but what about the tops of the 2 shoulder straps? I had 2 options: First, I could drill a 12 mm hole in the parcel tray behind the rear seat, and mount it there with my “bolt hanger”/ carabiner trick, but that would leave a hole. But it would look cool and manly, but holes are not great in a very original classic car. The second option was only viable due to the 1966 Giulia having a factory hole behind the back seat, where I could pass the seat belts over top of the back seat, and snake the belts behind the back seat through an existing hole, and connect them to something solid in the trunk. Option 2 proved the winner, as I was just plain nervous about drilling visible holes in the car. In hindsight, I have shown many this installation and almost unanimously, the car guys have said they would have done option 1, as it would really look rough and tough, and it adds to the car – and I do agree, it would look great. Either way, it’s a great way to make a flexible and extremely strong mounting system. Just clip/unclip the carabiner, and the harness is installed or removed in a matter of minutes.
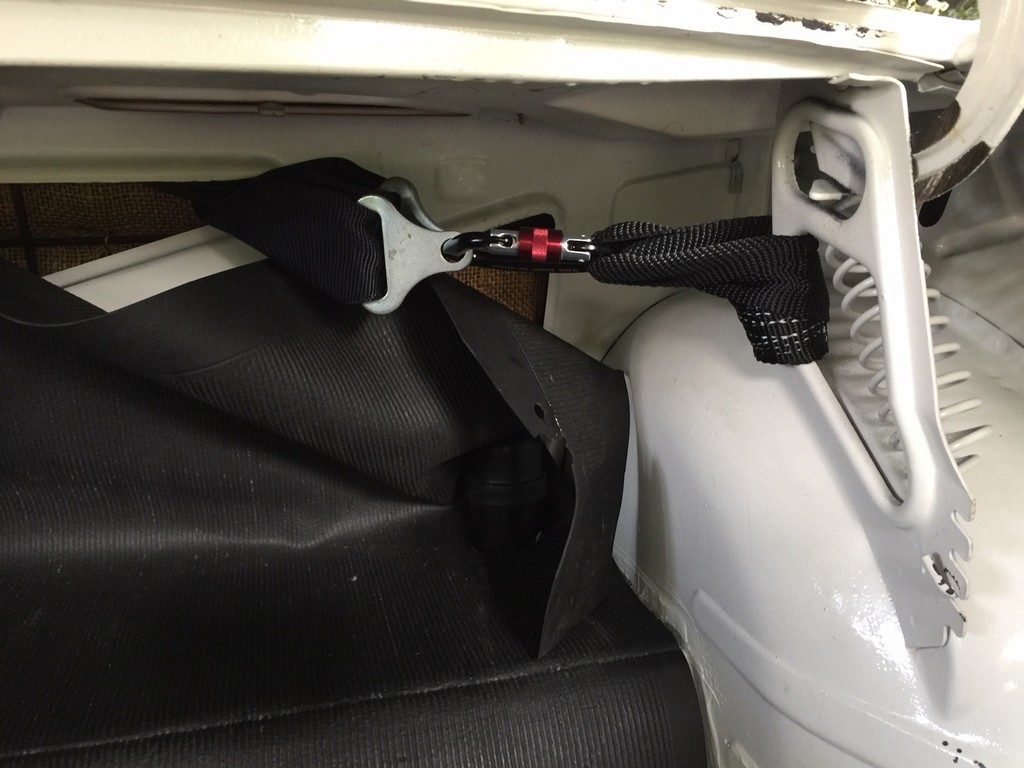
Shoulder straps attached firmly to the car. Cloth straps rated at 10,000 lbs.
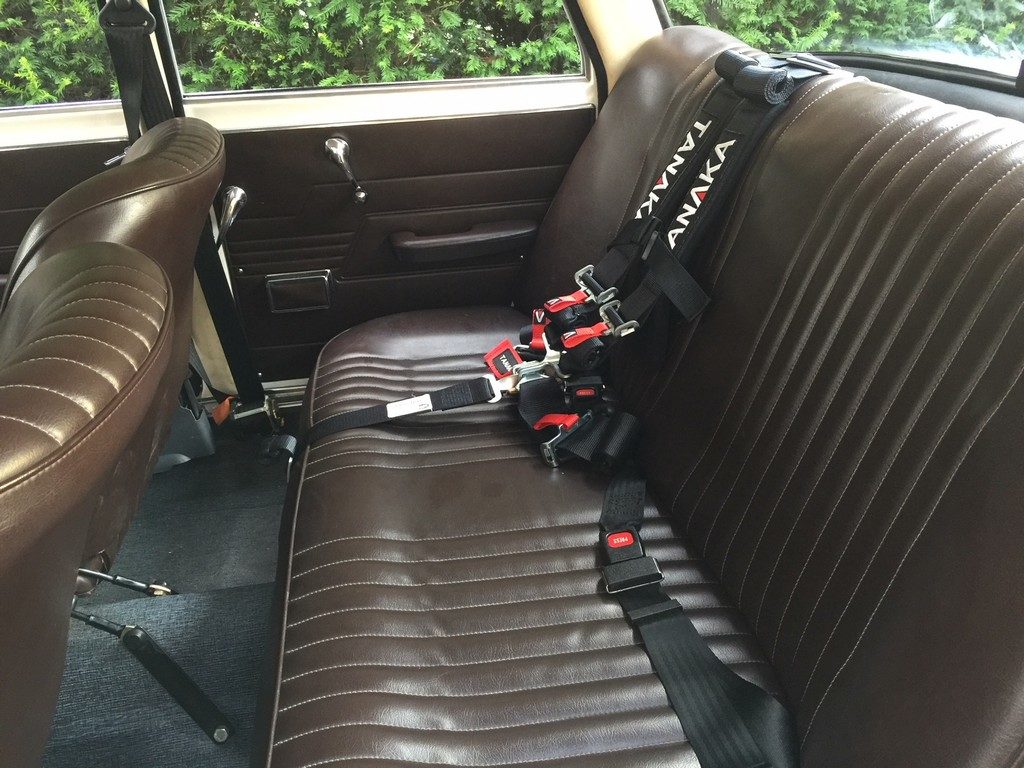
Looks good even sitting still.

You expect an 8-year-old to figure this out? Sure!
Extra strap material is rolled up and zip tied. Nice and tidy.
Good optional mounting location for the ‘latch’ like mount.
I took a file to the main latch and took maybe 1-2 mm of material off the mating area that secures the latch between 2 ball bearings. I did this as I needed an 8-year old to be able to operate the latch by themselves, and the shape of the metal had such a high ramp that it took a lot of strength to latch the belt – it was actually hard to latch for an adult. Unlatching was easy, before and after the modification, so there was no apparent loss in the safety of modifying the latch system. I put some WD40 and graphite on the spring loaded ball bearing, and that also makes it much easier to operate. Check out the picture to see my modifications.
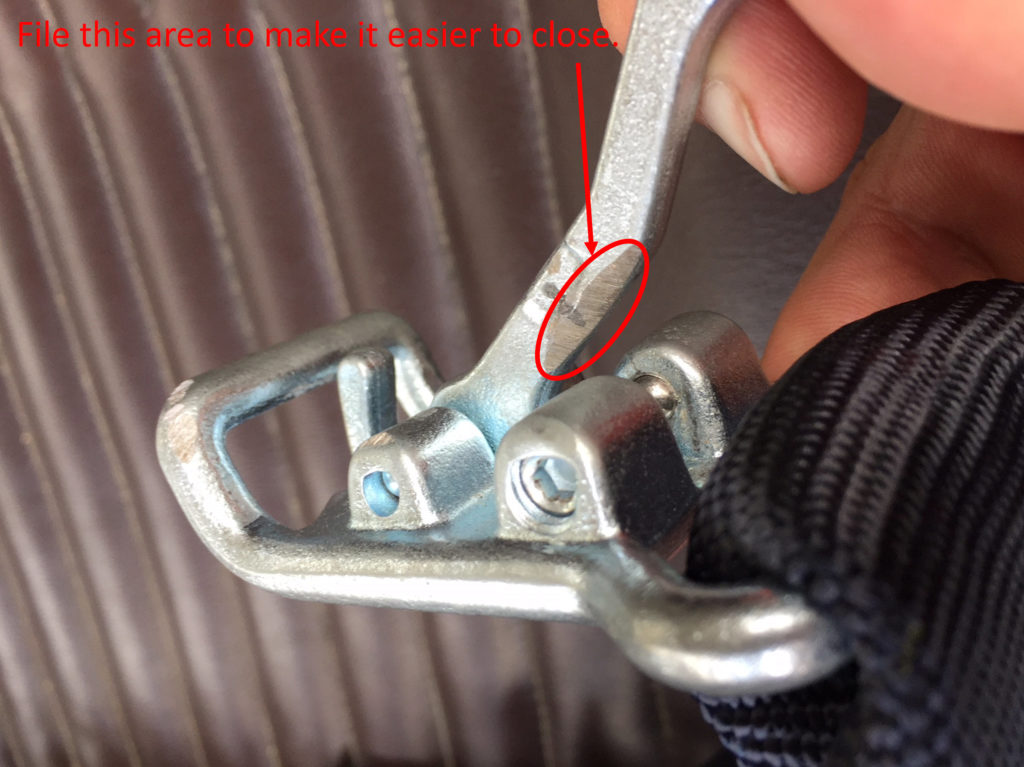
Seat belt clasp filed to allow for easier closing.
Just to show you how easy it is for Jake to get in and out, we made a little video.
Hopefully, my photos are clear enough, so you can add these belts to your classic, to keep the kids safe, moms happy, and you get more use out of your classic.
Parts used:
- 5-point harness from Tanaka. Be sure to get the wide strap version. Approximate price is $75. https://www.amazon.com/gp/product/B01MG0D0SG/
- Bolt hangers. There are different bolt sizes available, so go with the 12 mm hole, as you are not guaranteed what size bolts come with the lap belts. https://www.amazon.com/gp/product/B01KVUJSMY/
- These have a high strength rating and their cross section diameter is small, so it fits in the seat belts and ‘bolt hangers’. https://www.amazon.com/gp/product/B01M59LLZN/
Modification 2: Third brake light is really important, as most classic cars have very poor brake lights.
Since new cars have had third brakes lights since 1986, there is a dwindling demand for 3rd brake lights as many classics are rarely driven. Dwindling demand means a tiny amount of choice. If you search on Amazon, you will find a limited choice of very ugly options. I have purchased many of these lights and found all the new ones have a strip of LED lights that float near the rear window. This “float” part is important – I have found that if the lights are not inside a little plastic box that is glued to the rear window, the light spillage of the red LED lights inside the car driving at night is extremely unpleasant. The car entire interior will glow with a red light every time you touch the brakes.
What is a boy to do? Make your own! Oh, I forgot to tell you, I have access to CAD and 3D printers, so we are making a brake light is fairly straightforward. Hoorah.
Remember, I bought the car in Greece. So, I have no access to it for measuring or seeing where a wire could go. The internet has plenty of photos of old Giulias stripped to the bones, as they are popular race cars. I did all my research online to find the angle of the rear window and other critical considerations. We needed to make a design that would technically work and fit the aesthetic.
First, we set the design goals:
- Tiny
- Tiny
- Tiny
- Close to unnoticeable
- No embellishments
- Hidden wire
- Glued to window with 3M VHB tape, to cut down stray light
One of the most important photos we used was the seller’s rear view and side view photos, as they were done very well and at the correct perspective for planning the light. With the photos in hand, we could use our CAD tools to measure the angle of the rear glass, so we could custom make a perfectly fitted 3rd brake light.
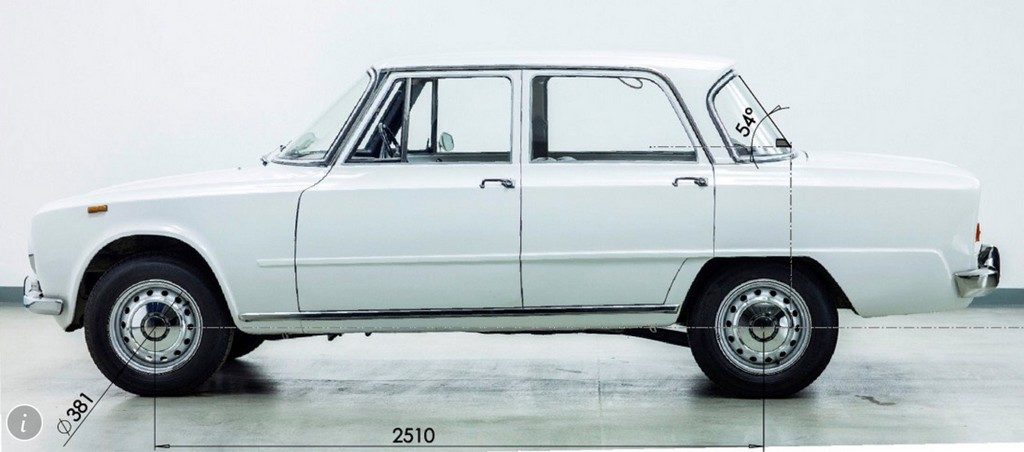
CAD drawing of the third brake light, showing window angle.
In my past, I used some excruciatingly bright red LED lights from Revival Cycles, and they are called “super nova” for a good reason. They are almost too bright. Here they are on the Revival website. With our initial design, we tried a 2 LED light layout, but we decided it was just too bright and we did not want to gain the attention of Johnny Law in Europe. We actually made the 2 LED version, with a subtle shape of the Giulia boot lid shape as part of the design. Although it was only 10 cm x 3 cm (4” x 1.25″), we decided that was not “tiny” and adding the Giulia shape to it violated the “no embellishments” edict.
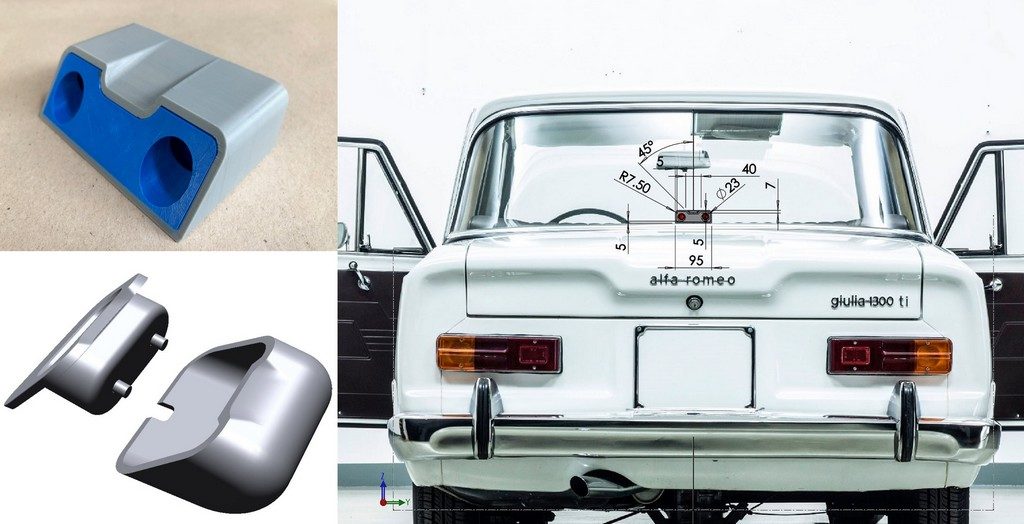
The 2 LED version, as you can see it takes design elements from the Alfa Giulia’s trunk line.
Our next design, we went super small. It is 4 cm x 4 cm x 4 cm (1.5” x 1.5” x 1.5″). It was the winner. We went so small; we took the LED from Revival to a grinder and bevelled 1 edge of the light, so we could get the LED even closer to the rear window. We did that for 2 reasons a) close to the window meant less plastic obstruction of the light and wider field of view, and b) we can make the entire light enclosure smaller. We like small. Here are some pictures…
CAD drawing of the third brake light.
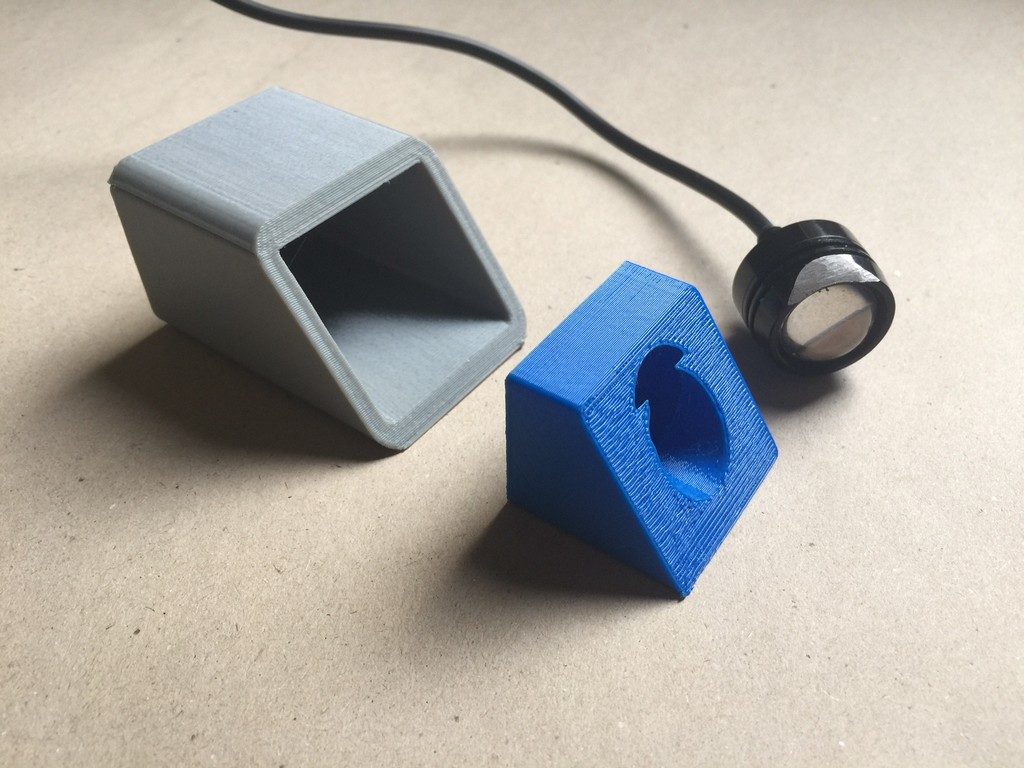
Simple. Simple. Simple.
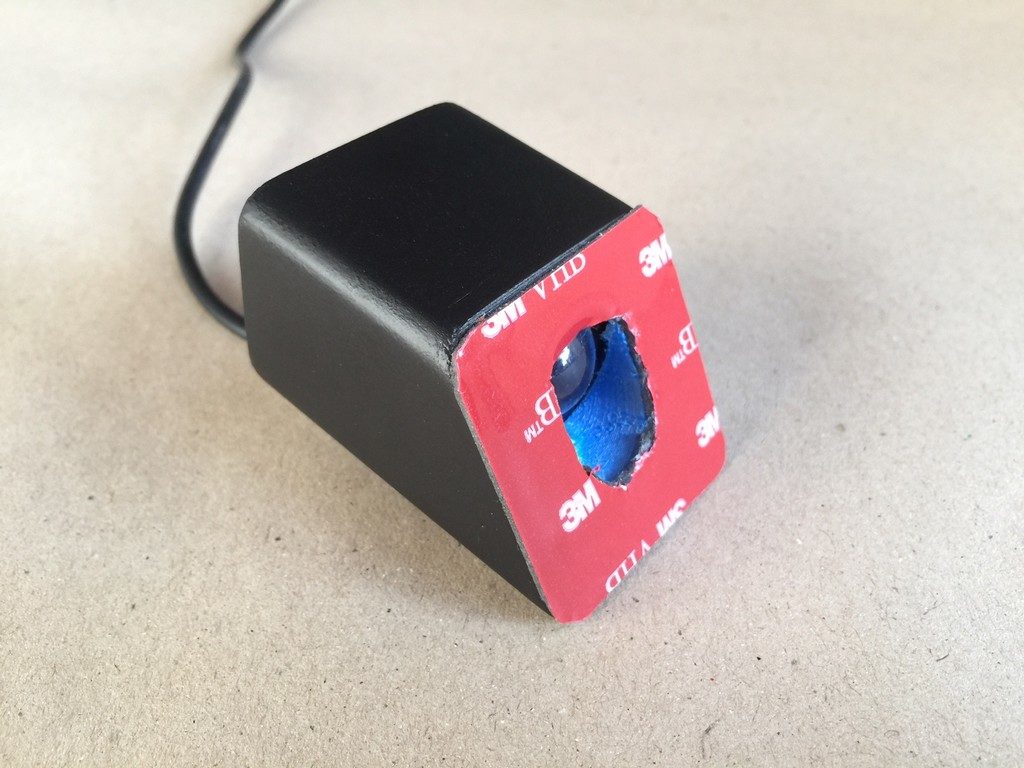
Simple peel and stick mounting.
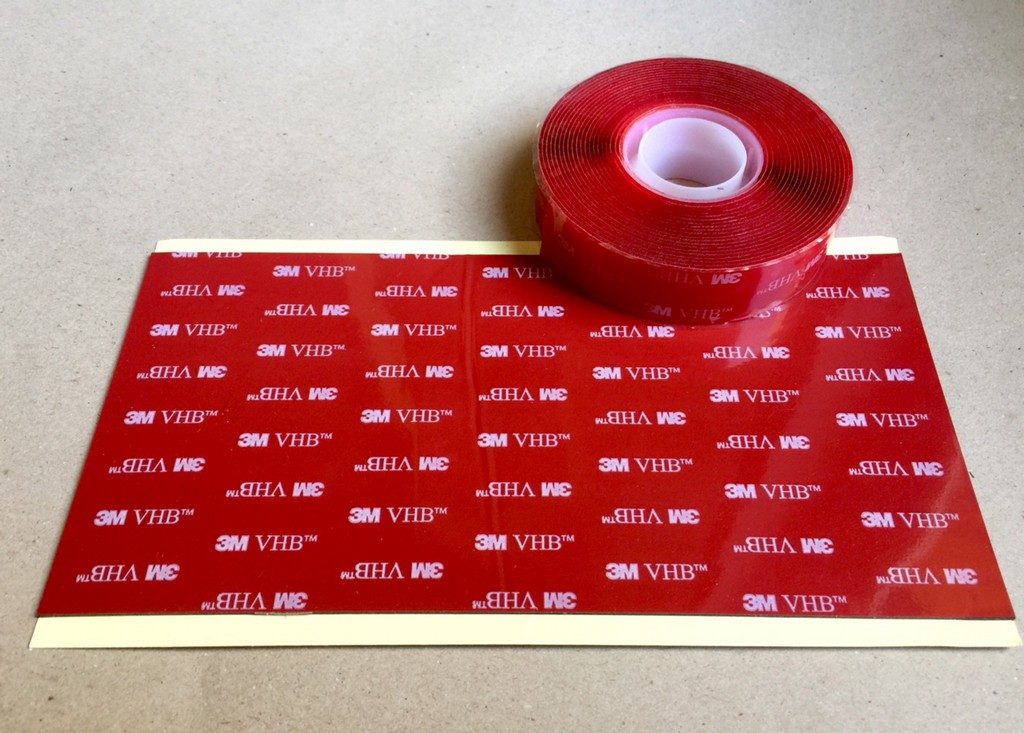
3M VHB is available in roll or sheet form.
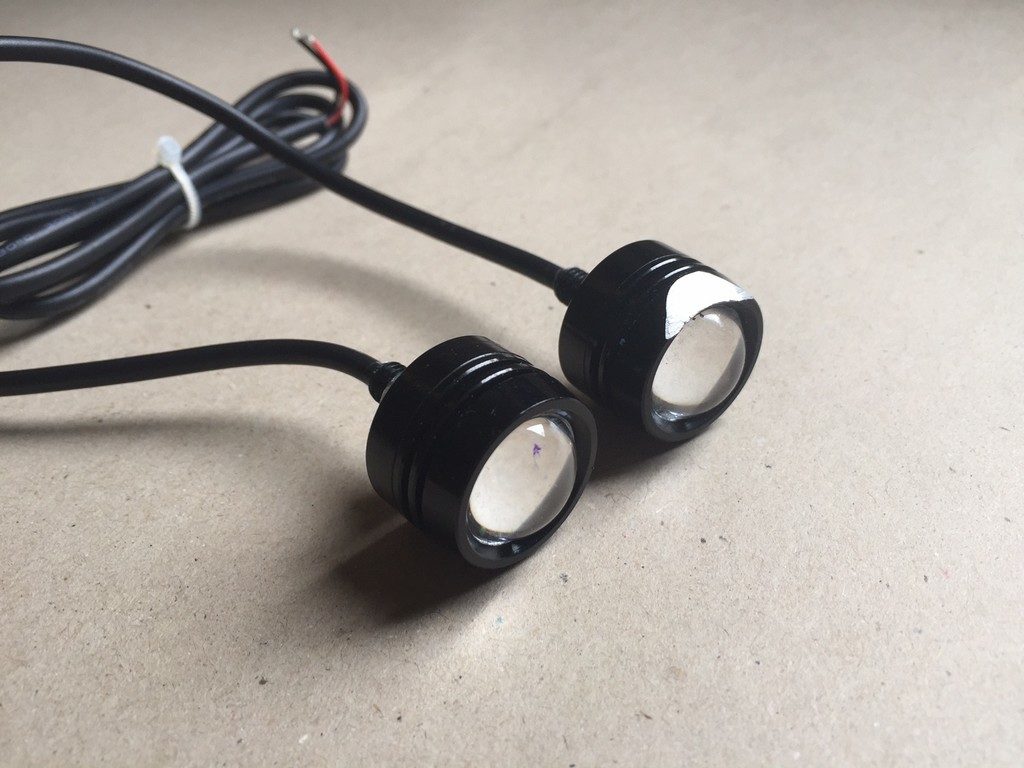
Had to grind a bit off the LED to make it fit our design.
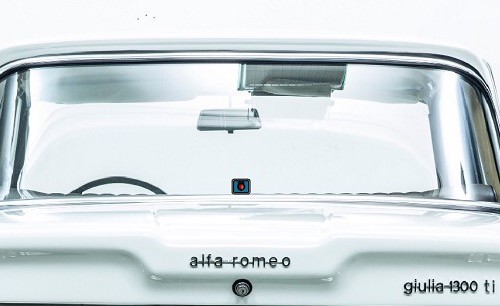
How does it look in the car? You be the judge.
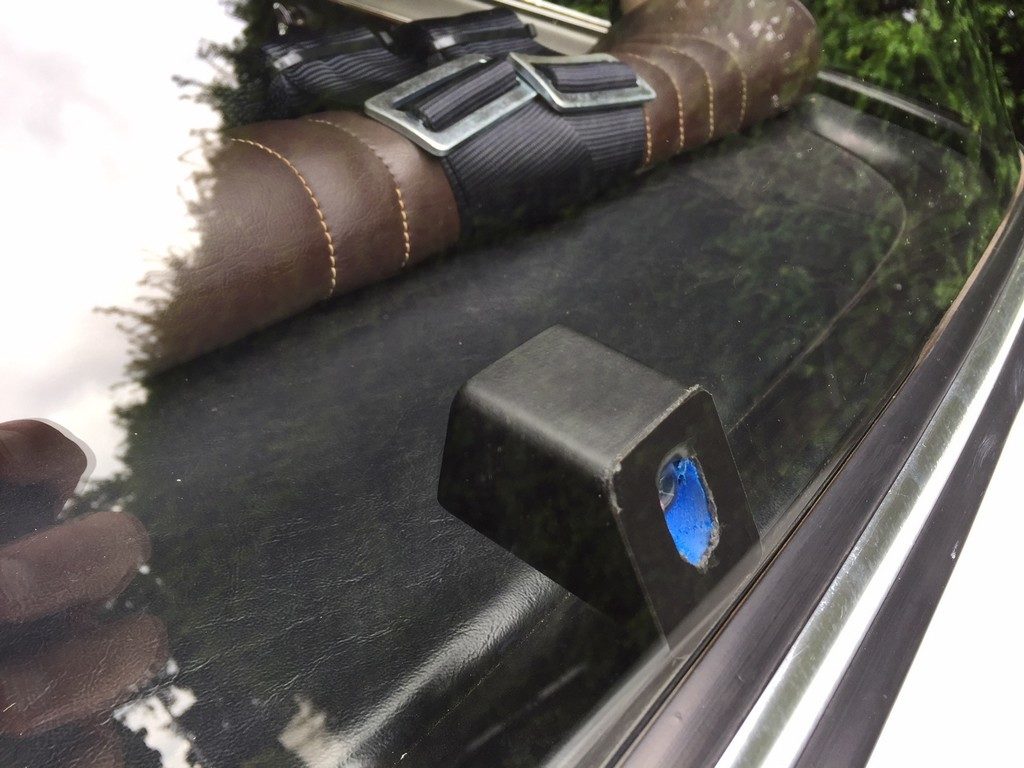
Third brake light, firmly taped to the rear window. Tiny.
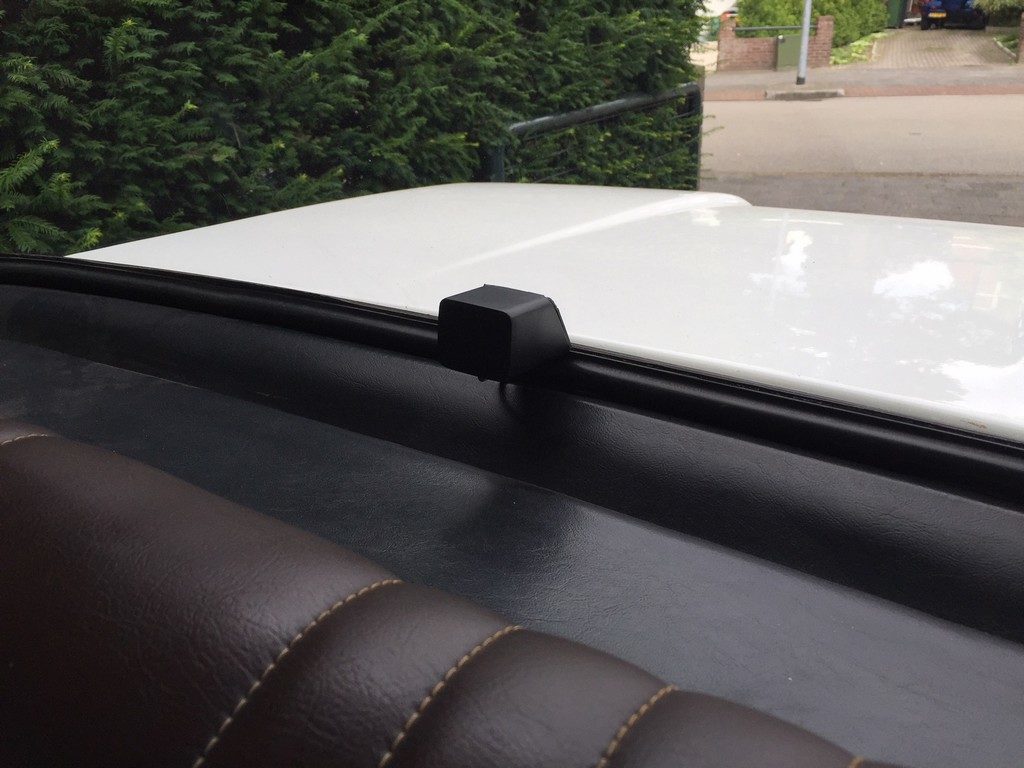
Third brake light, looks good on the inside too!
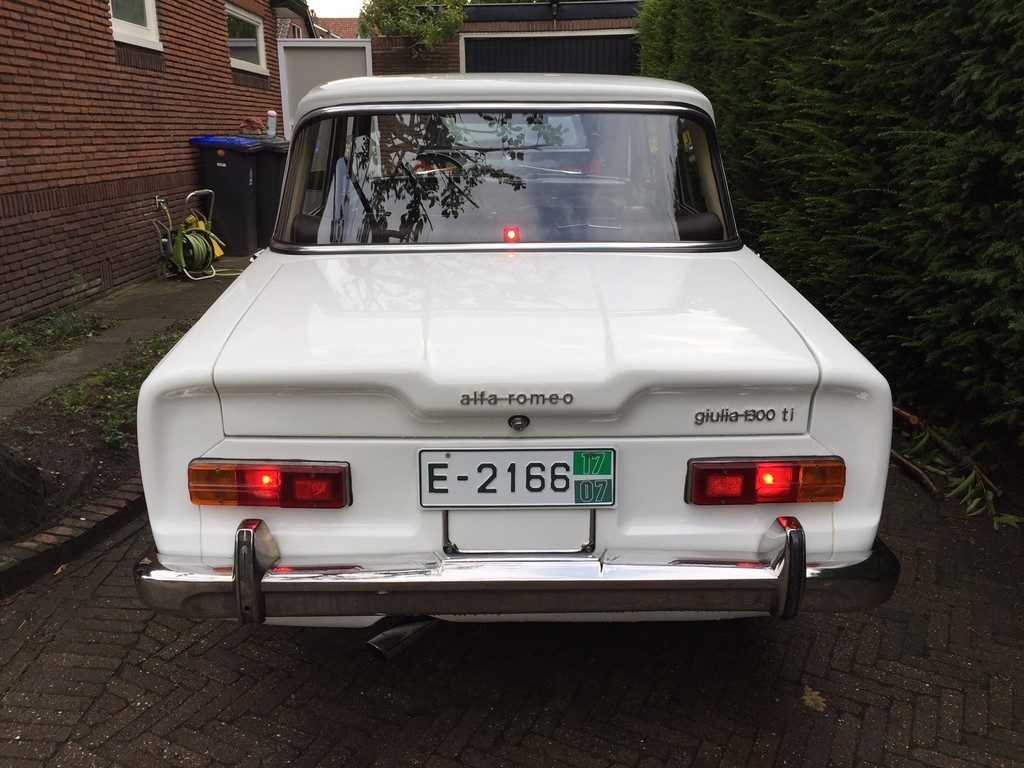
Simple bright red dot.
Is it bright enough? We think we made the right decision with the single light in Europe. Europeans are much stricter on car modifications. America is much more laid back when it comes to custom cars and modifications, so perhaps I will upgrade the car to 2 or even 4 LED, as I do notice my fellow American’s don’t really pay that much attention when they are driving. I can get 4 LEDs in the size of the first design we had, and that is still very small and discrete.
We are happy to share the CAD and 3D printer files if anyone wants them. Just use the contact form on the website, and I will eventually get the email message.
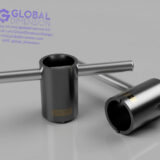
Modification 3: New electronic distributor.
‘123 Ignition’ electronic distributor or some form of electronic ignition is a must have. A 50-year-old distributor, the vagueness of mechanical points, is just not for me. On every car, I install a simple Pertonix or an expensive 123 Ignition system, and I notice my joy of driving increases. Perhaps it is a placebo effect, but I really don’t care – the placebo is working.
I bought this from AlfaHolics.com (jim.spackman@alfaholics.com can answer all your questions).
I don’t have much to show, except for a picture of an old distributor, and a photo I got from the company website of a new 123 Ignition distributor. The 123 Ignition unit is beautifully made. I got this Bluetooth model.
This is a nice YouTube video that shows how precise the timing is when using this distributor.
For the best advice on setup, the guys on the AlfaBB are pros, just search the forum. http://www.alfabb.com/bb/forums/
The distributor has a light built into it, so you do not need a static light. Just get your car to TDC (marked P on the pulley) or the fixed timing mark (marked F on the pulley) and get the little static light to turn off. Lock it down, and you are set. Start the car with a default curve, and plenty of alternative curves are suggested for the various models of Alfa on the AlfaBB forums site. Please, note that I mentioned you could set your car to TDC or the fixed timing mark – the forum folks seem to disagree with which one to use. I used F, as it made more sense to me.
Remember, you get this really cool set of screens to play with, have fun:
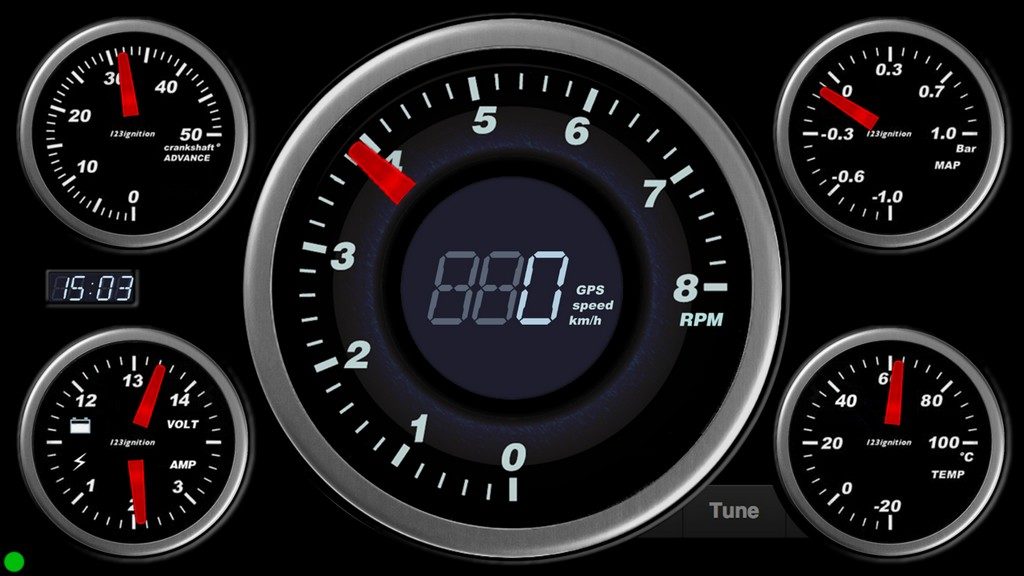
iPhone app screen of the ‘123 Ignition’ electronic distributor. Cool beans.
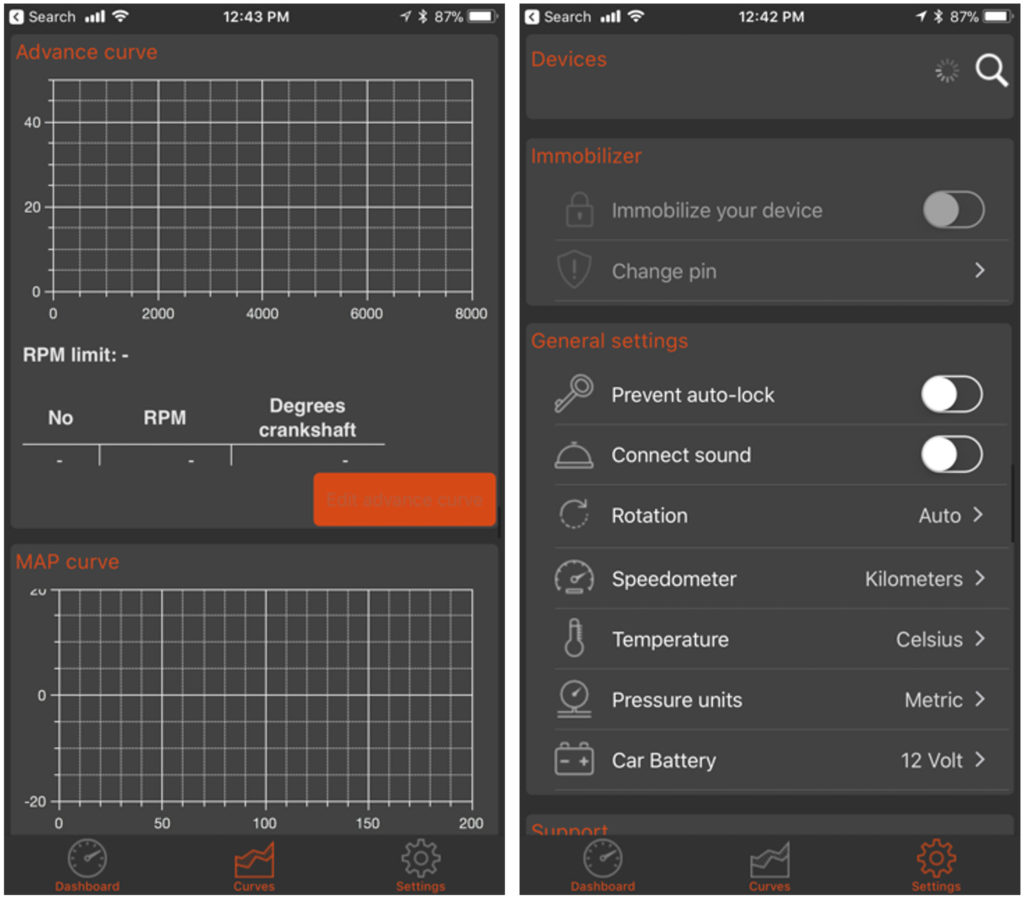
iPhone app screen for the ‘123 Ignition’ allows you to adjust ignition curve, MAP and has an immobilizer!
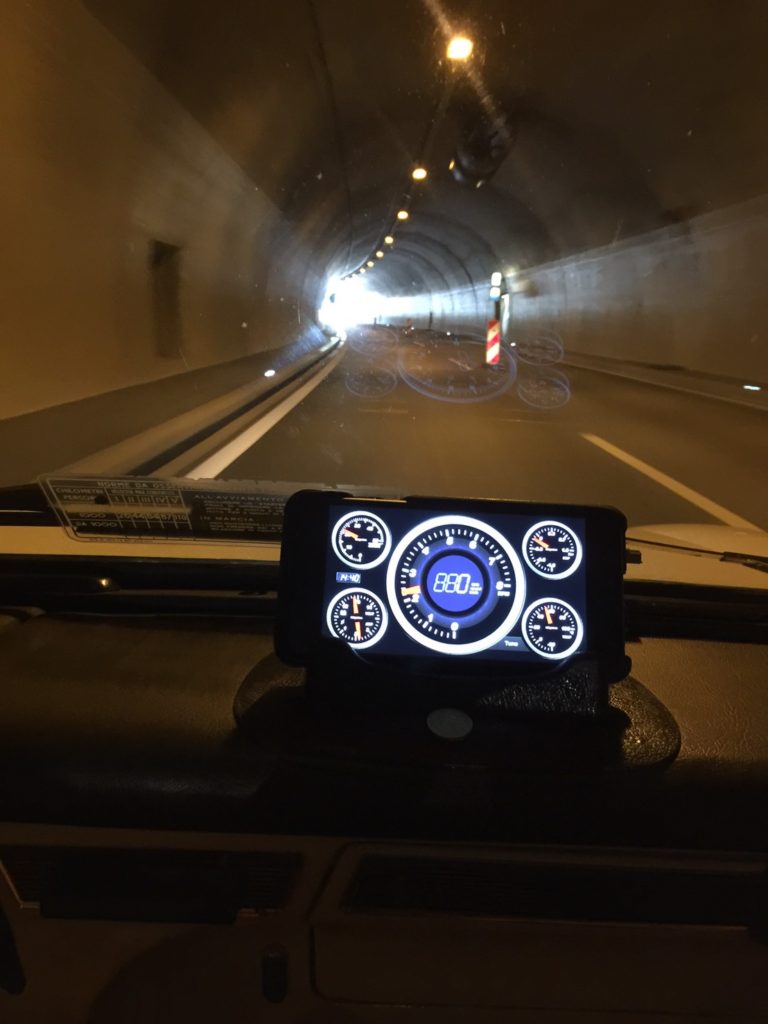
Look at my new toy #2. Modern engine performance display on this old dashboard.
Modification 4: Rear view mirror
The Alfa rear view mirror is tiny. There is no passenger side door mirror. A wide-angle rear view mirror is a must for seeing your opponents (fellow drivers).
I have used quite a few different mirrors on various cars. I really like this one as it is not too big and not too small, and it has just the perfect curved mirror to give me a wide angle view. Of course, I could have put a big mirror with 5 separate panels in the car, but it would not be very wife friendly. To each his own.
I was happy with the AllView mirror. The rubberised clamps really grip the mirror, and I never had an issue with it slipping. Check out the pictures, to see the difference between stock and the new mirror.
The mirror is on Amazon (of course) https://www.amazon.com/gp/product/B0015FYQ90/ .
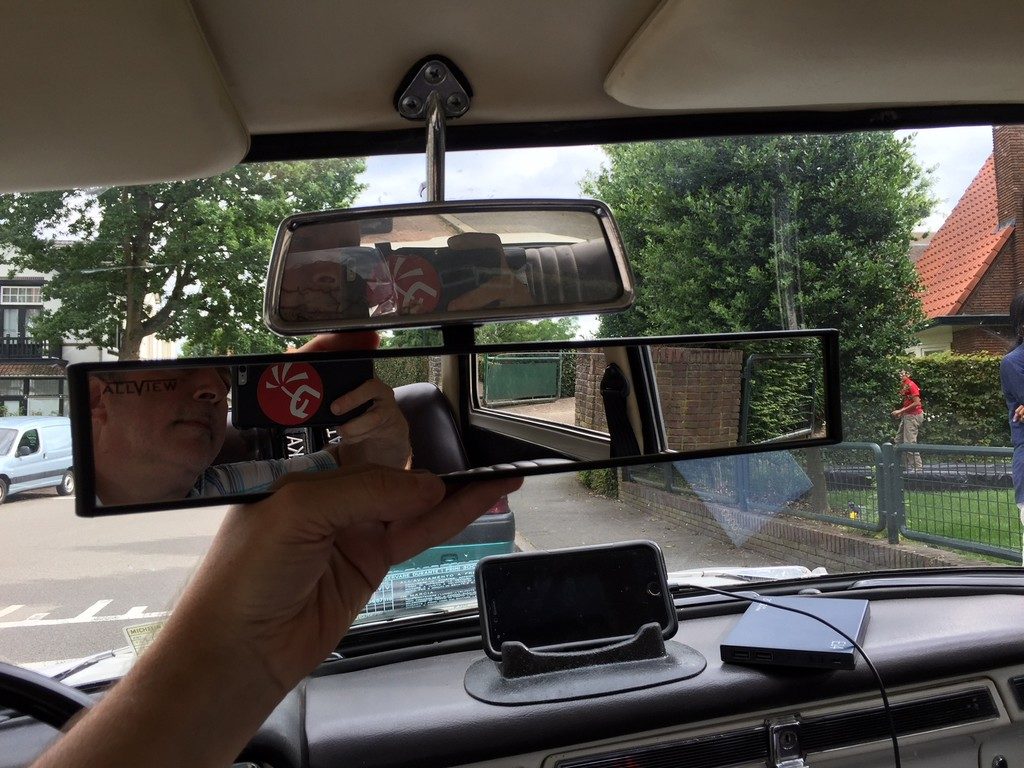
Wide angle mirror is a must have safety feature.
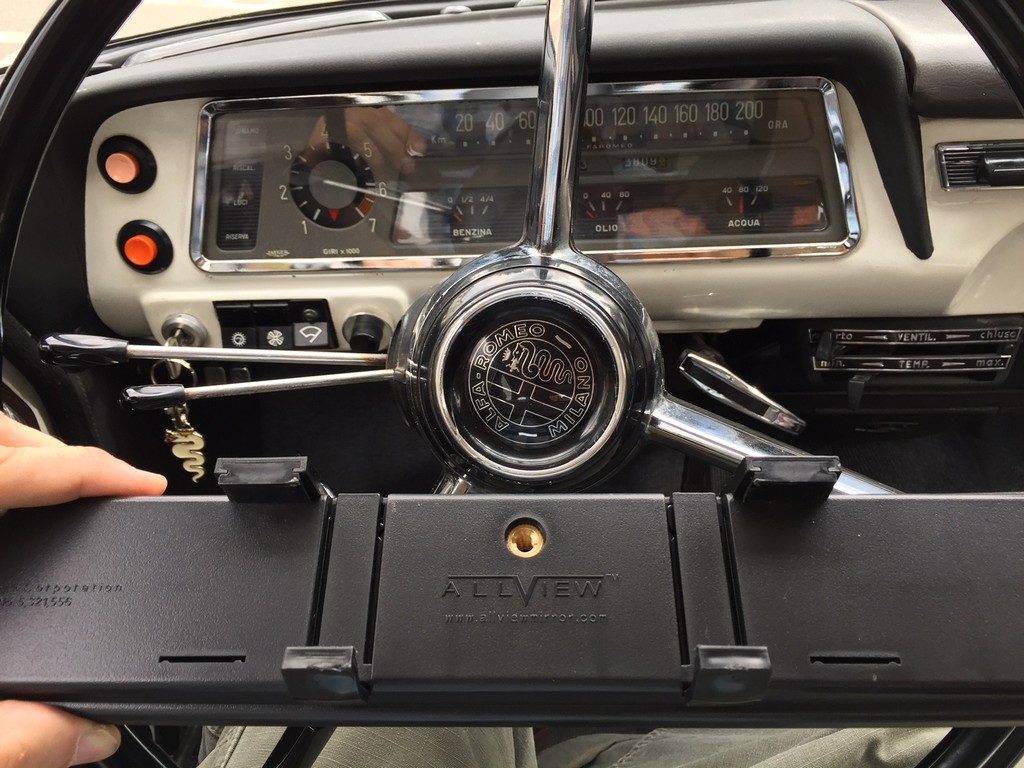
Back of the wide angle rear view mirror. Spring loaded clips.
Modification 5: Cigarette lighter/USB ports
Cigarette lighter is a must for today’s electronic devices, and in the Alfa, there is no cigarette lighter in the car, so we hard wired it to the a switched 12v source. To do this, we cut the plug off the end of the cable. Is there a big difference between different cigarette adapters sold on Amazon? I think there is if you are a USB port fanatic. Many USB ports are limited to 1 amp so that the charge rate can be quite slow. Newer Apple phones and iPads won’t even charge with such low amperage and demand the 2.1 amp outlets. The “Te-Rich” adapters output is 6.8 amp spread over 4 ports, with the 2 ports on the front are 2.4A and the side ports are 1.0A. It is available on Amazon at https://www.amazon.com/gp/product/B06XPDDQ81/
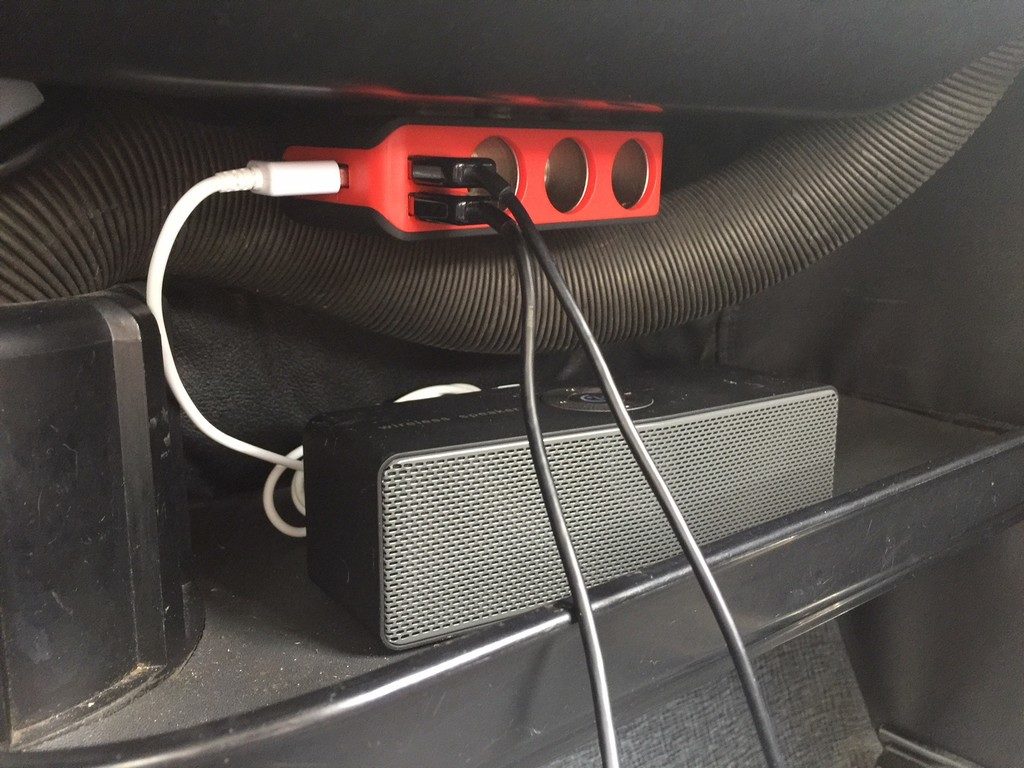
The parcel tray was a handy place to mount the cigarette lighter and put the Bluetooth speaker.
Modification 6: Bluetooth speaker (not really a mod, more like an addition)
The little Alfa has no radio and has no provision in the dash for one. The car simply was designed before this was a standard accessory. 4-wheel disc brakes are standard, but not even a blanked off hole for a radio!! Who cares, as the new Bluetooth speakers are amazing. There is a parcel tray under the dash and it fits a Bluetooth speaker, and even hidden under the dash makes an excellent sound. This time I did not buy on Amazon, but I bought it in Bangkok from a street vendor. Its equivalent is probably a $50 version on Amazon. Don’t go too cheap, as you will have no base notes at all.
Modification 6: Portable USB battery (alright, an addition)
We carried a small 20,000ma battery with us, so we could always have our phones charged up. Although we had the charger in the car, sometimes we would forget, and having the battery came in handy a few times to make sure we were fully charged before we would trek up Mt Vesuvius. Not much to say on the battery, as I think they are really a commodity item. By the way, 20,000ma is the largest battery you can carry on a plane (for the carriers and routes we flew).
+++++++++++++++++++++
More tinkering, Stateside.
+++++++++++++++++++++
After the car arrived in America, I did a little bit more tinkering. Some were necessary maintenance/safety items and others were to add more pleasure to driving an old car.
- Sheepskin covers. Wish I had these on the trip. The vinyl seats were a little sweaty in the summer heat of southern Europe.
- Front retractable seat belts. The Giulia had the original Klippan retractable seat belt, but they had seen better days. New set makes it much easier to get in and out. Wife and father are much happier.
- Little pouch between seats. Old cars don’t have all the places to put things like modern cars do. This little pouch was super handy.
- Oil in steering box? When we serviced the car in Italy, we noticed the steering box needed oil. But the oil would drip out over 5-7 days. This new 1200w lube fixed that problem.
- Fixed a broken heater cable with a lawnmower part.
Modification 8: Sheepskin seat covers
I have always loved sheepskins in my cars. Cool in the summer. Warm in the winter. No sliding around on vinyl, and the seats are protected. So, where do I find some for a 1966 Alfa Romeo? Not easy, as all the vendors are geared up for big volume cars, and not some old classic they might get 1-2 orders a year.
Googling around I found some sheepskins on Amazon and they said they would customise them for your car, just send seat measurements. I messaged the seller immediately and found out they were Blondies Pit Stop in Durango, Colorado. Dorothy Weigman is the boss, and she answers the emails and probably does quite a bit of the sewing! She can be contacted at coverlady@aol.com. She asked for some basic dimensions of the seats and I emailed her this “I just measured my seats and the back is 19.5 inches at its tallest point, and 23.5 wide at its widest point. The bottom is identical in measurements (19.5 long and 23.5 inches wide). They are both roughly 4 or 5-inch-thick at the thickest point, they taper so it is hard to get a measurement.”. I sent her money via PayPal, and 4 days later I received the covers. Huh? Yes, insanely fast for custom anything.
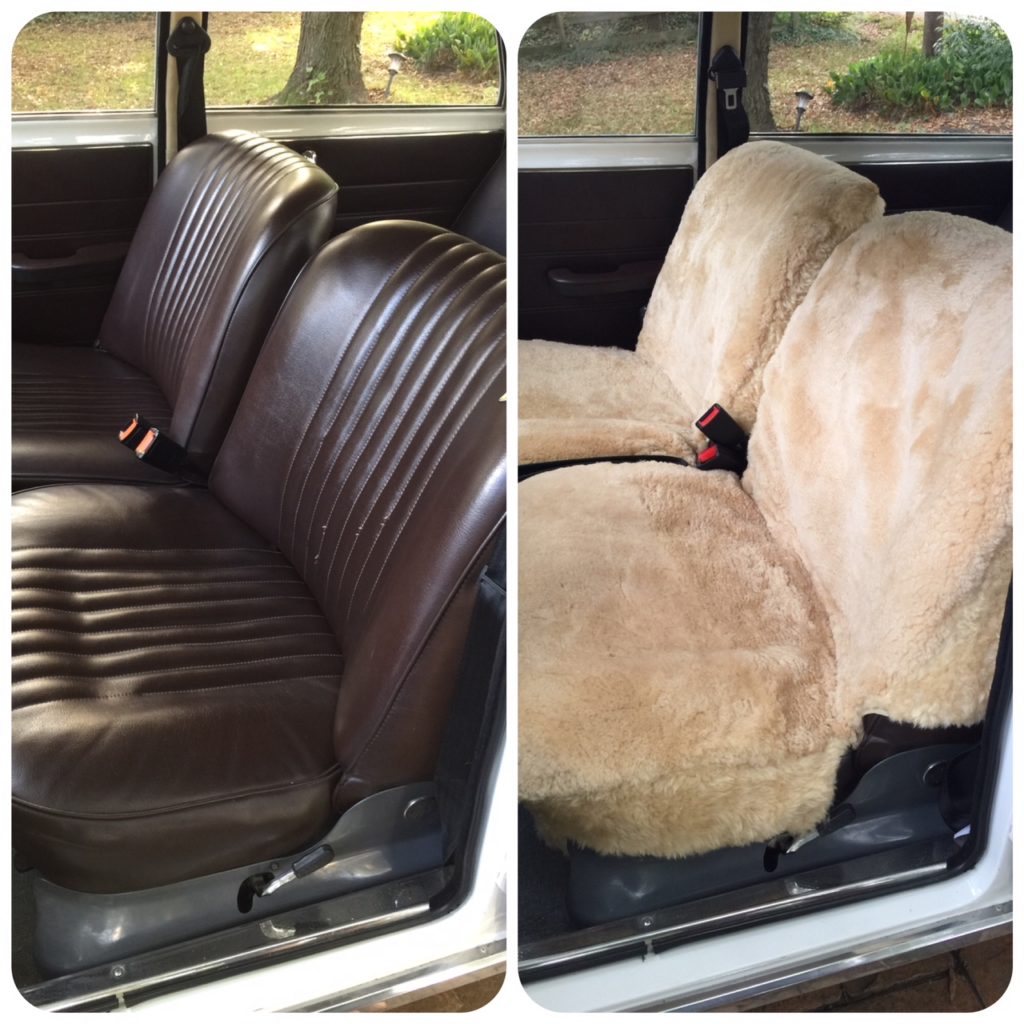
Glorious sheepskin covers.
As you can see, the covers look pretty great in the photos. They really transform the comfort of the car. Love it. Love it. Love it.
Could they be better? Only slightly. Dorothy does not have the seats in front of her, so she cannot see how the “shoulders” of the seat are rounded. If you want to get a really perfect fit, turn the covers inside out, and sew the shoulder area to make it a little rounder. You would not need to take in much material, perhaps only 3-4cm (1.5 inches), at the very most.
Modification 9: Front seat belts
The front seat belts were good quality retractable, but the passenger side retractable gear mechanism would take a bit of jiggling to make it move. With my main passengers being my wife that loves old cars but wants them to work like new cars, and my 93-year-old father, I needed seat belts to work flawlessly and be super user-friendly. I had a spare pair of seat belts from a previous project, in the garage. They fit perfectly with the 12-inch extension, some might like it a little longer, but it jumps to 18 inches and I think that would stick out too far.
I get my classic belts from https://www.seatbeltsplus.com/Classic-Car-Seat-Belts.html and https://www.retrobelt.com/
Modification 10: Front seat organiser pouch
There is always a need to access small things like coins, receipts, coupons you get from toll booths, a pen, perhaps a phone. But, on an old car, they never had convenient places for these things. There are now a wide variety of little pouches, cup holders, and other organising accessories available to fit on any car (all on Amazon). I found this little pouch that squeezes between the 2 front seats to be really handy. Wish it had a cup holder.
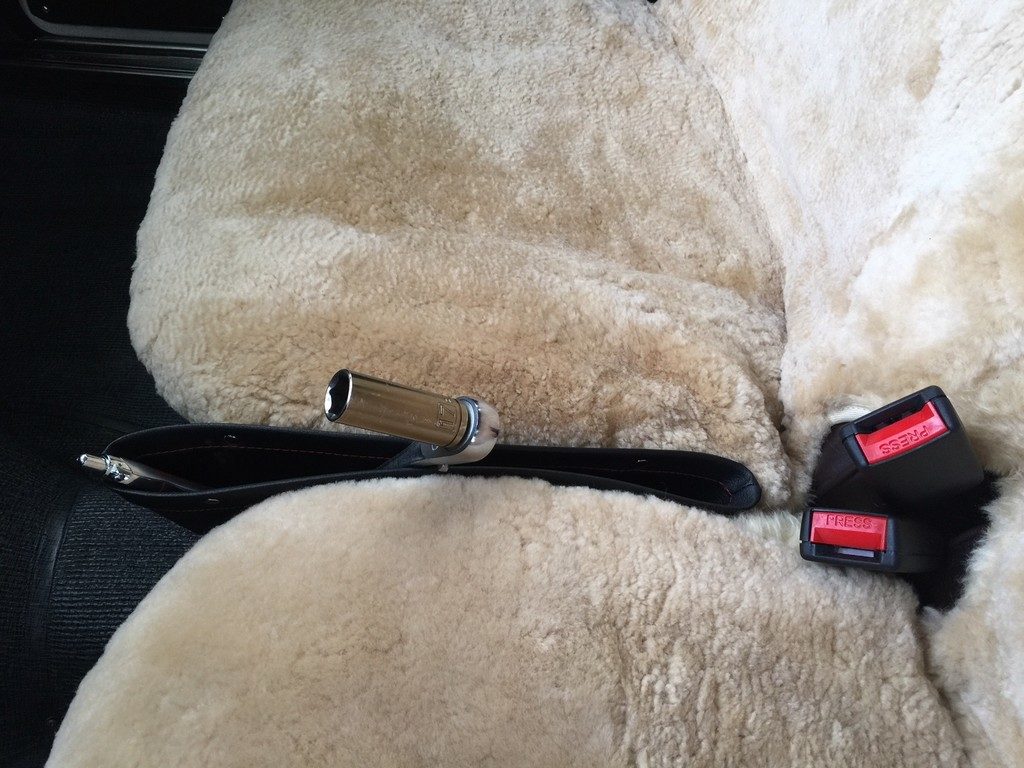
Handy pouch wedged between the seats.
Here it is on Amazon: https://www.amazon.com/gp/product/B071WQHN3D/ .
Modification 11: Steering box lube
When we were in Europe, I noticed a small puddle (like 20 drips) of oil under the car. Crawling around, I discovered it was the steering box we topped up in Greece with 90w. Every 5-7 days, I would add more oil, and it would slowly drip out. Not fun, but it worked as a short-term solution.
So what should I do to fix it? Pull the steering box and send it away to get rebuilt? That is a big job and wanted to avoid it at all cost. I remember reading an article on really thick lubricants for this type of gear, so I googled around and found there are lubrication/oil companies that make a special oil just for leaking steering boxes on classic cars. It seems many people have this problem with just about every brand of old car made. I settled on Penrite Steering Box Lube which is a 1200w “oil”, that has the flow characteristics of runny mashed potatoes, or a thick oatmeal, or Jello® if you let it solidify and then put it in a blender. At room temperature, if you hold the lube container upside down, it will pour, but very slowly.
To get it in the steering box was easy if you just used some basic common sense. I had a plastic syringe from an old project laying around, so I used this to suck it out of its container and squeeze it into the steering box. But, I was worried that it was so thick, it would not sink down to the bottom of the steering box, and I wanted this steering box to be packed with this lube. I wanted no possibility of air spaces and dry gears. So, I boiled a pot of water and I put the oil container in this hot water, bringing the lube to a much higher temperature and greater ability to flow. After boiling it for a few minutes, I figured it was good enough, and ran out to the car with the syringe and a very hot container of lube/grease. About 2 minutes later the box was full and gushing out of the top. Job done. I had some left-over lube, and I bought a second bottle just in case, so both of these went in the trunk for future use.
There is plenty of discussion on this type of grease on various forums. Some people make their own. Some add graphite powder. Some add “moly”. Some add 90w on top.
So far, there has not been a single drip from the steering box. I think the steering box feels better now. I am delighted with the result.
I was curious to see how hot the steering box got, as it sits right next to the exhaust headers. I wondered if it got very hot, would this lube get really thin and with this lowered viscosity it gets into more places and possibly gets thin enough to find its way out of the leaking seal? I started the car, and let it run for 15 minutes to get it plenty hot. I took a laser thermometer and measured both the header and the steering box temperatures, and it resulted with headers = 190 °C (380 °F ) and steering box = 43 °C (110 °F). I found this 147 °C (270 °F) difference to be quite surprising, as they are separated with only 10cm of airspace, there is basically nothing closer to the headers than the steering box. Everything else in the engine compartment must be much less affected by the engine heat.
Modification 11: Broken heater cable fixed with lawn mower part
The car spent the last 15 years in Greece. There was very little need for a heater in Greece, so my guess is the heat was not turned on for many years. The heater on/off lever is attached to a water valve with a solid wire cable, and that water valve was very stiff. After moving the heater on/off lever several times, trying to free the water valve, the solid cable broke. Sunk into despair for a little bit, thinking how hard it was going to be to find a replacement cable. After I opened the dashboard cover to see the broken cable, I recognised it as being very similar to the cable used on every lawn mower in the USA, to control the carburettor. I went to the local hardware store and bought a replacement cable for around $5. I trimmed the length. I put a wrench on the heater water valve and it magically loosened up and became free. After putting the new cable in, everything worked, nice and easy.
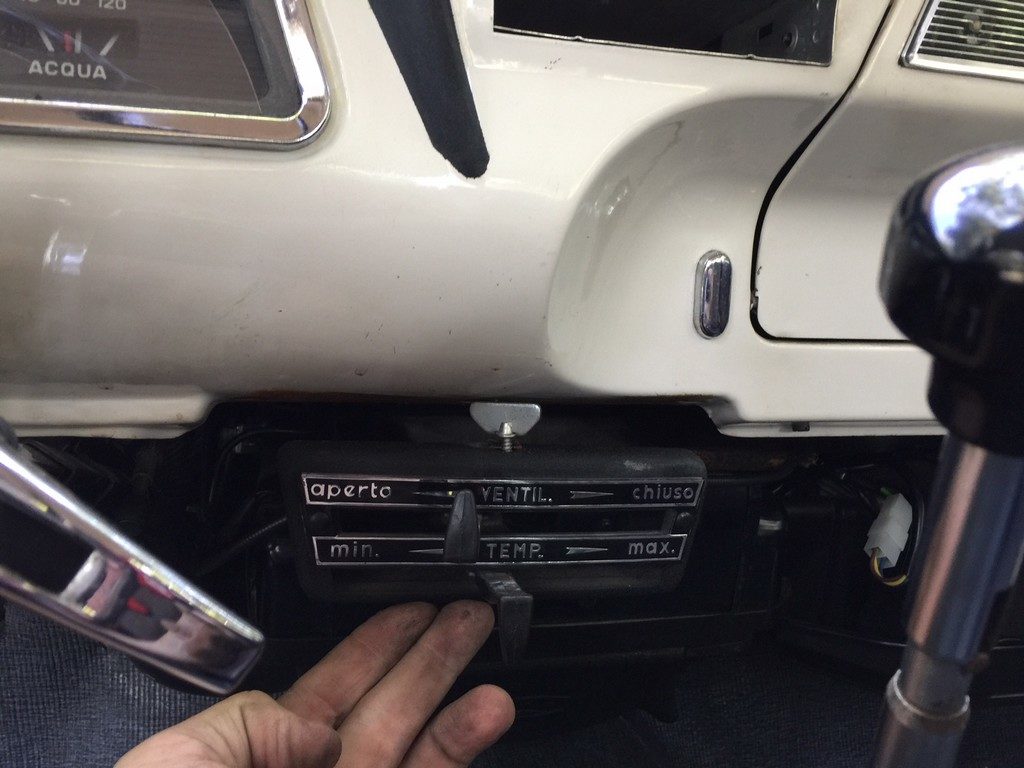
Broken heater cable lurks inside.
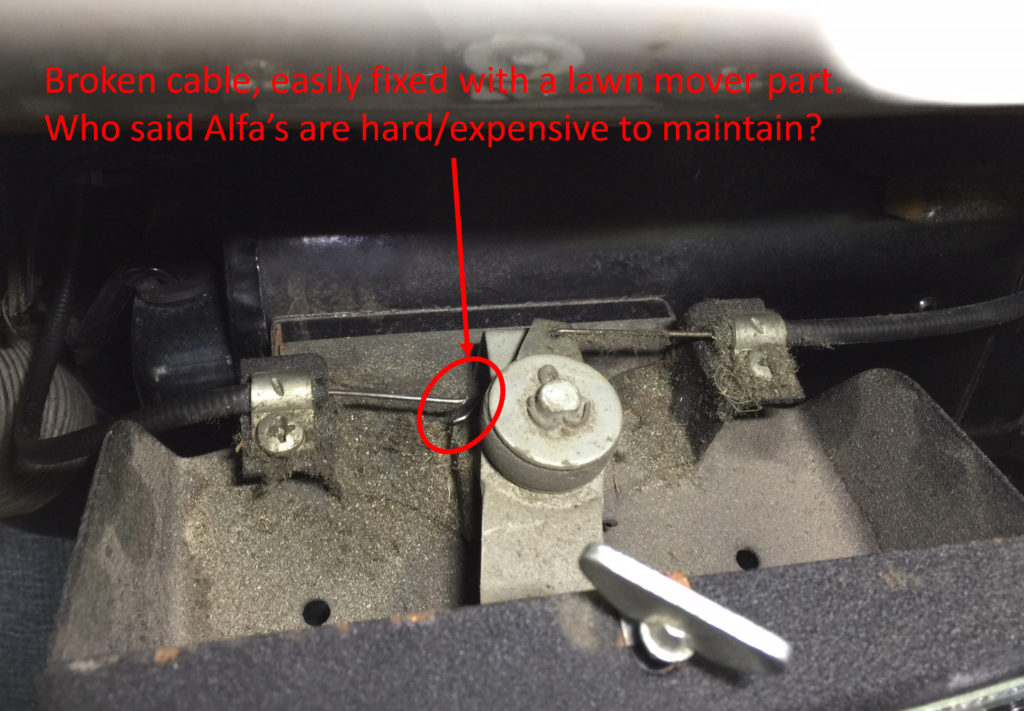
Heater cable broken = easy fix.
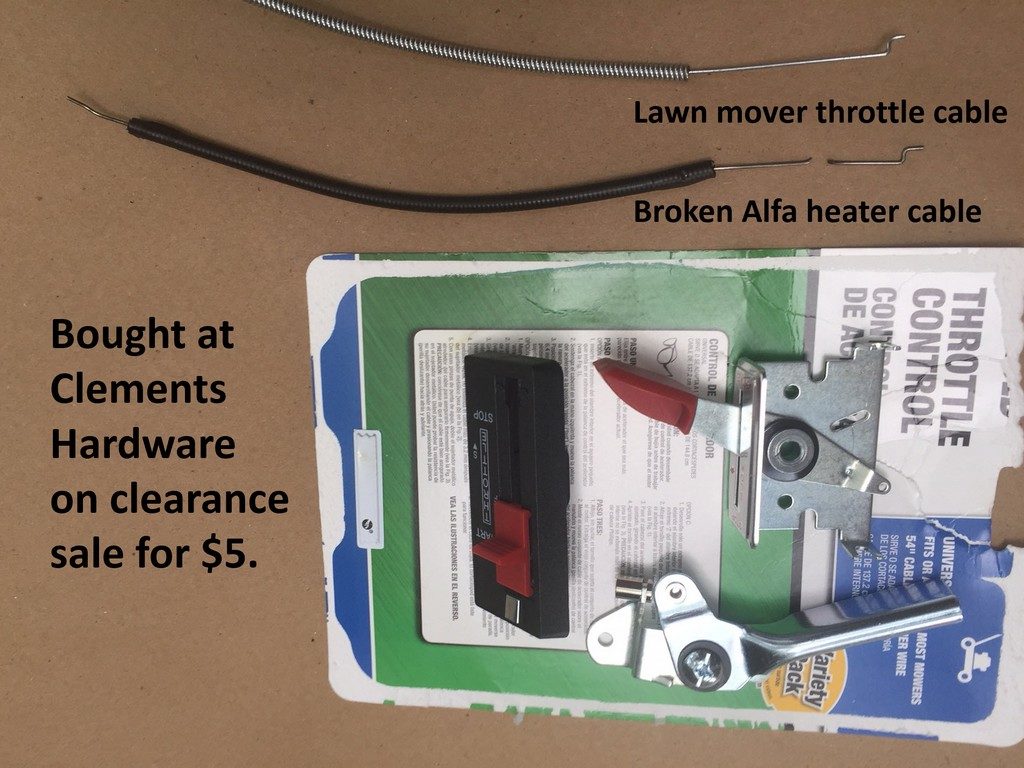
Cheap fix available at any hardware store.
+++++++++++++++++++++
Wrap up.
+++++++++++++++++++++
We had a pretty exciting trip. Once in a lifetime. Got to see some of Europe, and shared that experience with my wife and son. We had some small mechanical issues along the way, but that was also part of the story.
I am forever indebted to Enrico Minazzi and Mario Bianchi, for making my car roadworthy and safe, in Varese.
I tucked the car away for a little rest and plugged in the battery charger. Can hardly wait to wake it up and drive her around.
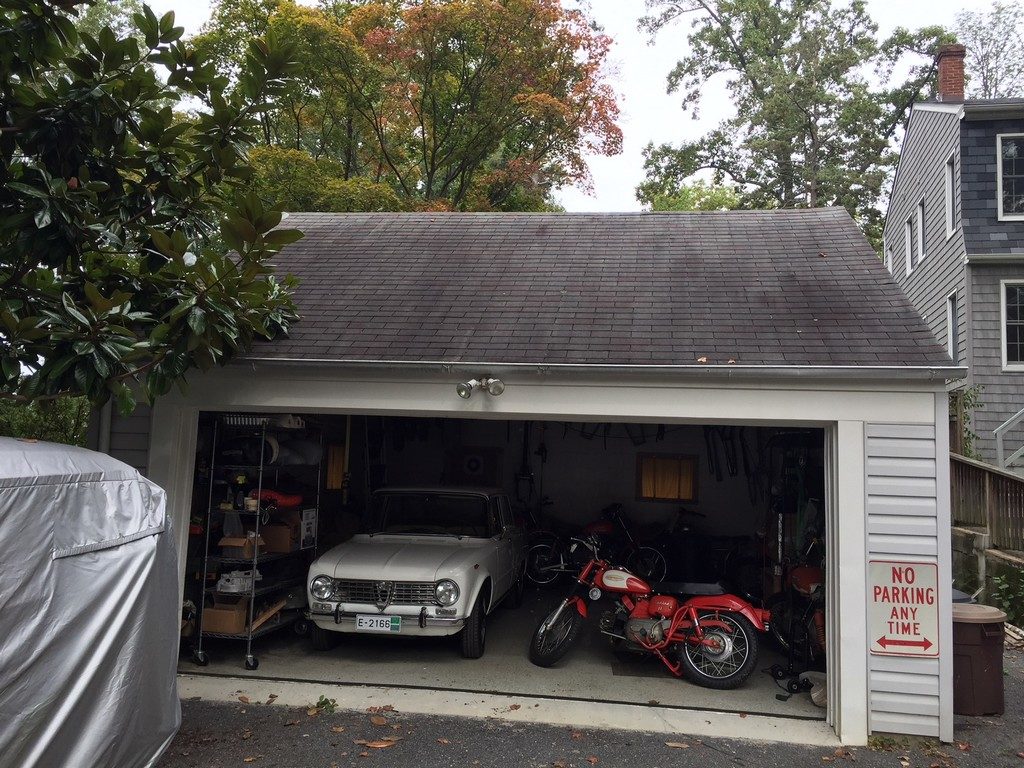
The Alfa sleeps with 7 Aermacchi and a Ducati, all from the same era.